Showing posts with label sewing. Show all posts

Wednesday, December 16, 2015

Harmony Art Sheets

I made a trip to visit MomStitches and the rest of my family in November.  While I was there, we had a very generous dose of snow, and "brisk" temperatures.  When I woke up in the morning it was only 8 degrees!!  This shows the thermometer when it had warmed up enough for me to go outside.


And my rental car. . .


So, what do you do when you are outside and see a broad expanse of pure, untouched snow?  Make a snow angel, or course!  It's been a few years since I've done this, but I still remembered how.


I brought along a sewing project, and MomStitches helped me with it.  I was making a sheet set for my friend Harmony's mother-in-law, who is recuperating from an accident.  Harmony supplied her own organic fabric for the sheets:  whispering grass in orchid, and orchid solid.  Such beautiful fabric is a joy to work with.  Here we have the fabric laid out all across the living room.  It was really nice to have MomStitches for a second opinion, and a second person to help "measure twice, cut once."


The fitted sheet was not too hard.  We cut a square out of each corner, then sewed up that seam. 


I used French seams, so there were no raw edges to fray.  Sheets go through many, many washings!


We used the solid orchid fabric for the top trim on the top sheet.  Then we combined the print and solid for a set of "opposite" pillowcases.  One used the solid with print trim, and the other the print with the solid trim.  I used directions from the One Million Pillowcases website to add the trim to them without any seams exposed.  Then I used French seams again to sew the sides and end of the pillowcases.


Sunday, September 14, 2014

Some Clothes for GranddaughterStitches

I recently sewed some new leggings for GranddaughterStitches.  She loves leggings, and almost needs to have them custom-made.  She is tall and slender so those long enough are too big around, and those that fit in the waist are capri pants!  

Here she is modeling her zebra leggings!  I saw this fabric and just knew it would be perfect for her.


Here is a closer shot of her zebra pants.  Perfect for every social situation, you know.


Another thing I thought I would try is making slashes in the back of a t-shirt for her.  I'm still finding out how wide to make them and where on the back they are best placed.  Fortunately, she has a little lavender tank top which looks great underneath it.

Thursday, April 29, 2010

Britches for BabyStitches

I made some little pants for little BabyStitches. Her birthday is this week (she will be two!), but I gave her these pants while she was here visiting, so I could see if they fit all right.

I had a lot of fun choosing the fabrics and coordinating fabrics for the little britches!

For the first pair I chose a beautiful pink/purple batik fabric, and a cute little yellow print for the ruffles and pockets.


For the second pair I used a real "juicy" citrus print that had been lying around in my stash for long enough. And I chose the light/dark blue leaf print for
the trim and pockets. These pockets are on the side, a la cargo pants.

I used McCall's pattern #M5916, which I had used previously to make BabyStitches some ruffled bloomers.


The pockets on this pair are in the back, but I thought BabyStitches might like to be able to actually use her pockets, so I made the blue ones with cargo pockets. BTW, the yellow trim on this pair is left over from the Winnie the Pooh quilt that I made for BabyStitches. It's nice to tie things together, don't you think!?!


Now we'll all have to hope that DaughterStitches sends me a photo of BabyStitches wearing her britches soon, so that I can show you how she looks in them! Hint hint.


Tuesday, April 13, 2010

Something for BabyStitches


Isn't this a gorgeous batik?!? I love the deep rich colors and the beautiful swirls in it. I found it a couple years ago when I was traveling to South Dakota to attend NieceStitches' college graduation.

And now I am turning it into something for BabyStitches, as she will very soon be turning two. (Hopefully, not "terrible two.") Hard to believe she's two years old already. Below is a little peak of how I'm using this fabric, strangely enough, by adding a yellow floral to it.

After her birthday I'll show you the finished product. Just wanted to let you know that I am getting some work done.

Also, I'm very close to finishing a wall hanging in progress. (I showed you a sneak peek of it in the last post.)

And I sewed another leaf for my project started at Asilomar.

Sew happy.

Thursday, October 22, 2009

Fairy Costume, Completed!

Hooray! I'm finished with the fairy costume for BabyStitches! Doesn't she look cute?!?
Now I'll show you some detail photos of this project.

There are eight petals that each have a pleat in the center, and are stitched around the waistband of the skirt.

The pattern said to use grommets for lacing up the sash in the back. But I didn't have any, so I just sewed some really small buttonholes, and that worked just fine!

The wings were really something to sew! Between the two layers of sheer fabric are two layers of stiff crinoline. In retrospect, I would have used a different method to achieve this, but the pattern said to sew the fabric right sides together, with the crinoline sewn in there as a lining. Now, I want you to look at that shape above and think about having to turn that sucker inside out when most of it is stiff crinoline!
Yes, if I were doing it again, I'd turn under the raw edges of the sheer fabric, and then sew them wrong sides together, with the crinoline inside. That way I wouldn't have to turn it inside out.

After the wings were together, I had to mark the fabric (with removable pen) on the lines they had given me,
then arrange chenille stems on those lines (overlapping when needed),
and then zig-zag them down with invisible mono-filament thread.
Except that the invisible thread is kind of a pain to sew with,
and broke way too often,
I think the wings turned out pretty well.
They attach to the back of the dress with eight-inch-long velcro strips.

When BabyStitches tried on the costume, she kept turning in circles, trying to get to her wings! What a sweetheart she is!


Even though I complained about the fabrics and the pattern a lot, I really loved sewing this for her. I wouldn't have had it any other way.

Tuesday, October 20, 2009

Halloween Costume (cont)

Here is BabyStitches, trying on her Halloween costume, part way through the sewing.
(She still has her little blue jeans on underneath the costume!) Looks like it might fit. I still have a ways to go, though, and these fabrics are a pain to work with! (See earlier post.)

I'll keep you updated.

Thursday, October 15, 2009

Fairy Costume

I'm a very lucky grandmother right now, because I am in Seattle helping to take care of my granddaughter, BabyStitches, for three weeks. It is really a treat for me. She is 18 months old now, and running everywhere. She's really a lot of fun. We dance and play silly games and play with toys, and play with the dog, Nala. We go to story time at the library on Thursday mornings, which takes me back to when I used to take my own kids to story time, and what a treat it was for us all. When it's not raining we go outside and scribble with chalk on the sidewalk, or throw a ball for Nala, or pick up small rocks and move them all over the yard. Everything is fascinating to BabyStitches.

The other side to the story is that--it is really exhausting!!! Taking care of a child is really hard work, so I guess it's another good reason for not having babies when we're in our 50's. Besides the fact that we would put them down and forget where we put them...

DaughterStitches asked me if I would mind sewing a Halloween costume for BabyStitches while I am here, and of course I said I'd be glad to. The pattern we're using is Simplicity 0544, shown below. BabyStitches is going to be a fairy for Halloween! A pink fairy!
Sewing this costume is rather a departure for me. I used to sew clothing, and use all kinds of different fabrics, but now I do mainly quilting. With good, solid cotton fabric!
For this I'm using tulle, and sheer fabric, and satiny stuff--fairly messy fabrics.
They are flimsy,
they shift around,
they ravel,
and they melt even when the iron is set on the coolest setting!
For the bodice I had to re-sew it three times because I melted the first two attempts.

But here is BabyStitches, trying on the bodice to her fairy costume. (That's Nala, my grand-dog, behind her. You'll see more of Nala soon.) I hope BabyStitches doesn't grow too much in the next two weeks or the costume won't fit her!


Wednesday, September 23, 2009

Bride & Groom Aprons

I have a second wedding coming up in my family! In addition to having SonStitches get married to MissesStitchesJr, my lovely niece is getting married very soon. Her nice friends gave a shower for her last week and invited me to it. (Was I maybe the chaperone?!?) The shower was lovely, and it was so nice to see how much all the girls care about NieceStitches.

This photo shows part of my gift to NieceStitches. I found patterns in Quilters Newsletter for a paper pieced block of a bride and a groom (June/July 2009 issue). Now, I haven't done much paper piecing, but I've always wanted to, so I decided to give these little squares a try. I purchased some plain, full bib aprons on which to sew the finished bride and groom. The block is only 3" square finished,
so there were many small seams to sew!


Here is the bride's square. I added an eye (French knot) and some silk ribbon embroidery, plus cotton embroidery to give her a little bouquet. Notice her very pointy little high heels!


And here is the groom's square. I gave him an eye, too, and using silk ribbon, made a larger French Knot to represent the ring that he is offering to his bride.


Then I added the little strips around the edges and sewed them to the aprons. I know that these two like to cook a lot (I've sampled their efforts, and they are really GOOD at it!). I hope that these aprons will be used and stained a lot!


Wednesday, August 19, 2009

Bloomers for Aurora

I made some cute little bloomers for baby Aurora. (They are actually white--don't know why they look greenish in this photo.) I used McCall's pattern #M5916. But the ruffles were my own idea! And believe it or not, I made these bloomers from a t-shirt of mine. I just found I wasn't wearing it much, and I cleaned/sorted one day to get more room in my closet. The bloomers were quite easy to put together. I have enough of the t-shirt left to make another pair, including ruffles.

Sunday, April 19, 2009

Sewing


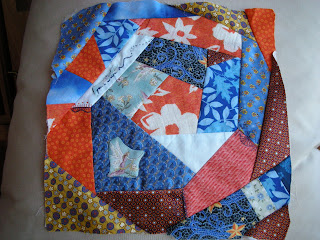
I finished this crazy quilt patch (12" square) for a Quilt Guild past president's quilt.  When each president retires, she gets to choose a design and everyone who wants to makes her a quilt block.  Sometimes they choose only a color or a specific fabric.  Sometimes they choose a particular pattern, whatever.  This past president wanted a crazy patch with orange and bright blue in it.  So there you go!  I embroidered my name on it, and a few other embroidery stitches, too, but mostly she wants to embellish it herself.


And I also got busy yesterday and made three "Taggie Blankies" for my Quilt Guild to sell at an up-coming art fair.  My granddaughter loves her "taggie," and I had lots of the pink minky fabric left, plus my zillions of ribbons, so I got these together pretty quickly.  The photo on the right shows a single taggie (about 14" square, more or less), and the left photo shows all three that I made, with their "back sides" showing, too.  They are a lot of fun, except that the minky fabric isn't the easiest to handle.  I finally got wise on the third one and used some iron-on interfacing on the minky.  

Saturday, April 18, 2009

Sewing


Here is a toy stuffed owl that I made for my dear granddaughter.  Thanks much to Susan Beal for the pattern, which appears in her book Button It Up.  You can find this at buttonitupbook.wordpress.com 

Also, the beautiful fabric I used came from Harmonyart.com.

He (she?) is properly titled Big-eyed Owl Button Toy.  I made just a couple alterations to Susan's pattern.  I used fabric instead of

felt, and I appliqued on the eyes and beak, instead of using buttons, since DGD is only a baby, after all.  And none of likes baby swallowing a button, do we!!!

It all went together easily and quickly.  Now I want to make some more, maybe using some of that lovely-feeling (but not so lovely to sew with!) minky fabric.