Showing posts with label applique. Show all posts

Tuesday, July 17, 2018

In a previous post (here) I showed you some of my handwork preparations for a road trip.  Then as it turned out, the road trip didn't happen, but it's always good to have some hand work ready to go.

I showed you the applique pattern I was using and preparing for.


The pattern for placement of the stem, petals, and leaf. 

Here is a portion of one of the blocks, edges turned under and pinned in place, all ready to go, except for the green circle in the flower center.


And this is where I stored those fabric squares!  An unused pizza box, courtesy of TwoFish Baking Company, a local bakery and pizza shop (on Friday nights).  You've heard me talk about TwoFish Bakery before, because I periodically sew aprons for them to wear.


I didn't want the fabric squares to shift around inside the box, so I took some small batting pieces and used long stitches to attach the batting to the bottom of the pizza box.  


Here are all the squares lying nicely inside the pizza box, staying put with no shifting about!


I also needed a way to transport my sewing implements, so I used this little metal box.  I honestly can't remember what came inside this box, and the label is not helpful!  It could have been tea, or it could have been cookies, I'm just not sure.


This is an inside view of the implement box, with threads, pins and needles, thread snipper, and needle threader.  I've chosen nice, fine threads for the applique.  Some (like the yellow and red spools) are Masterpiece and Bottom Line (from Superior threads), and some (like the skinnier spools) are ultra-fine Invisifil threads.  I really like sewing with very fine threads, especially for applique work.  I'm really not quite sure why that wine cork is in the box--who knows!


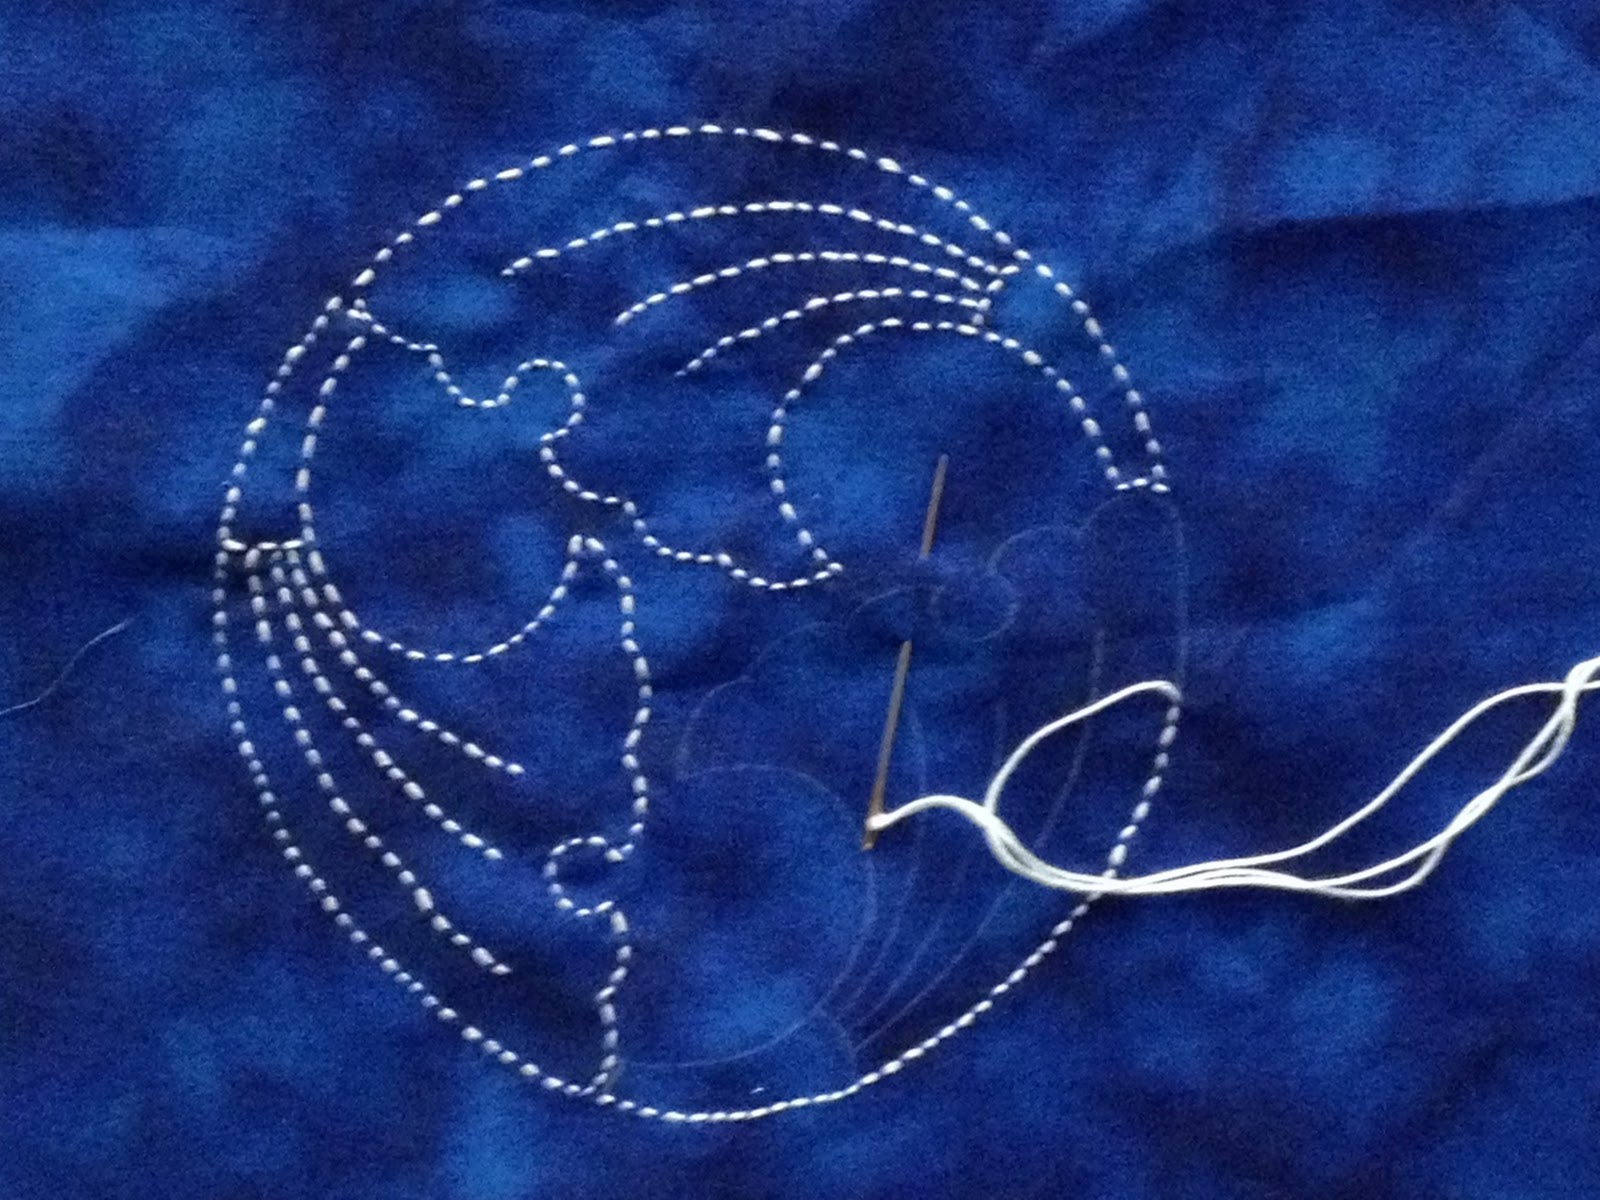
Here is a close-up of a sewn flower, still waiting for its green center!


Here is a finished block.  This batik fabric has a few different prints, all of the same colors.  The other half of the pieced blocks are various yellow fabrics that I had in my stash.


Monday, April 23, 2018

Applique Handwork For a Road Trip (Part 1)

For our road trip to southern California, I prepared a few pieces of hand sewing that I could work on in the car.  As long as it's a straight highway, like Highway 5, I can sew in the car.

I found this image on Pinterest.  I really liked the design of the blocks, and thought this would be a fun way to use up some purple-ish fabric that I have.  


There was no pattern or diagram, so I had to make my own.  This is my first attempt at drawing the design.  I decided on 12 1/2" blocks, and below is the left-hand side of the block.  It took a little experimenting to get the right size for the petals and leaf.


Here I refined the drawing  so that I could make templates.  


I made templates from double layers of freezer paper.  I made a cutting template and a separate actual-size template.

Below is where I am using spray starch and a make-up sponge brush to press down the edges of the leaves.  I didn't have a proper brush when I started, so I was using a Q-tip for an applicator.  Of course, that became fuzzy after a bit and was unusable.  But they're cheap, and they do have two tips on one handle!  Then I decided to try a makeup-applicator.  It seemed to work well, but then it, too broke down after not too long.  I guess it's not intended for this purpose!


Spray starch in the can's lid.


Here are several finished pressed petals.  They look a little like small canoes, don't you think?!?


Or maybe pea pods!?!


Here is my test square.  I have lots of this purple batik fabric:  different "dye patterns" but the same colors.  I sewed the purple to a few different yellow fabrics that I had in my stash to make the background for the flowers.  

I glued down the stem and petals for the appliqué  and that worked fairly well.  But there was a definite presence of glue!  Maybe I was a little heavy-handed.


This close-up shows the purple fabric showing through the paler yellow fabric of the flower petals.  I took care of that by using a scissors to trim out the back purple fabric.  That went pretty well, until I snipped a hole in one of the yellow petals!  AAARRRGGGGGHHHHHH!  I think excess glue on the petals made it too hard to separate the petal fabric from the purple background fabric, which aided in my snipping the petal fabric.

I can fix this by removing that damaged petal and sewing on a replacement.  So the whole block is not wasted.


 Now I have about 16 blocks all ready to take with me in the car.  I have used pins instead of glue.  On this test block, I hadn't yet added the green leaf to the stem, or the light green circle to the center of the flower.


Friday, April 28, 2017

Hawaiian Applique

First, a little story.  

My family went to Hawaii for vacation several times, when DaughterStitches and SonStitches were quite young.  At the place we stayed, they offered a lot of arts and crafts.  That was right up my alley, so to speak, so I really enjoyed these sessions.  I learned some Luahala weaving, some palm leaf crafts (including origami Christmas ornaments!), lei making, crafts using shells from the beach, and Hawaiian appliqué.  The woman who taught almost all of these was known as Auntie Eleanor.  Auntie was a dear lady, kind and patient and knowledgeable, and reminded me a lot of my own grandmother, who quilted, knitted,  and did a lot of other crafts, too.   As the years went on, Auntie Eleanor retired, but I always remembered her fondly. 

Now forward to a couple weeks ago, as I was looking through a cabinet of UFOs (unfinished objects).  I found this little blue and cream Hawaiian appliqué block.  It had about one eighth of the appliqué completed.


Below you can see the part where the appliqué had been started.  If you look close, you can tell that the stitching has been done by more than one person.  That was how Auntie's sewing sessions worked.  Someone would come to the table and want to learn how to do this.  So Auntie would show them, and they would start sewing.  Often, that person became bored, or frustrated, and left the project.  So there could be quite a few people working on one appliqué block!


I found it very interesting to see where Auntie Eleanor had probably started, then someone else added stitches, then maybe a third person sewed a little bit.  

This is where I finished up the block, using a lighter-colored and lighter-weight thread.


Close-up of appliqué.

The next step is to sandwich it so I can start the echo stitching.  This will probably be a pillow.

Friday, May 22, 2015

A Large Handwork Project

One day while at a friend's house, several of us were sitting around the table doing some hand sewing.  One woman was looking through a "Fons and Porter" magazine (Sept/Oct 2014) and turned to the page with this quilt.


It immediately caught my eye because it is so colorful.  I really liked it.  My friend gave me the magazine--so nice of her!  And I proceeded to check out this pattern.


It is designed by Susan McDermott.  The magazine said that she made the quilt using hand appliqué, but they were giving the directions for how to make it by machine.  It just so happened that I was looking for a new hand-sewing project to carry around with me to quilting-friend get-togethers.  So I started in on it.

The pattern supplied templates, which I copied onto cardboard (for drawing on the fabric and cutting out the circles) and template plastic (for ironing the edges under).  There are actually four different sizes of squares in this quilt.  The circles are appliquéd on to the squares, then the blocks are cut into four pieces and re-pieced together.  I will do all of that work by machine, you can be sure!


Here is what my workload looks like.  I need 187 of the larger blocks and 33 of the smaller ones.  That's quite a few, but I've already gotten a fair number of them sewn up.  All of the small 4" square-circles are done, and quite a few of the larger ones are, too.


And the best part is that they are totally made from my scraps!  Not that it seems to have made much of a dent, but it's a start.


The block above shows a circle pinned to a square.  I iron the squares into quarters so I know where the center of each side is.  The circles have lines marked on them, too, so I know exactly where to place them.


After the circles are appliquéd on, I cut out the excess background fabric behind the circles in order to reduce the bulk.  The photo above shows this, although it's a little hard to see.


And here is the the same square seen from the front. 

I will be sure to keep you updated on the progress of this quilt. 

Saturday, May 9, 2015

It's That Time of Year Again

It's that time of year again when I make a new "number t-shirt" for GranddaughterStitches.  The number this year is Seven!  How can she be this old already!?!  

I purchased the necessary t-shirt in the appropriate size, then searched through my computer fonts for a suitable number 7.  I decided to use the CurlzMT font, which gave me this number 7.  I like the 
curly-que at the bottom, and I think GranddaughterStitches will, too!


After I had printed out the 7, I took my pen and added a little more width to some of the narrow parts of the number.   And I ended up with this image.  


  I thought that would give me a little more fabric to attach to the t-shirt.


I then fused the number 7 to the center front of the t-shirt.


After that came the machine blanket stitch all the way around.


And here is the final result!


I opened up a few stitches on the side and added this little tag that says 
"PS I love you."


Happy Birthday, GranddaughterStitches!

Wednesday, April 17, 2013

Asilomar - Sylvia Pippen - The Process

Here is some more info about my class with Sylvia Pippen at Empty Spools Seminars/Asilomar in Pacific Grove CA.  I'm going to show you the process Sylvia taught us.

Here is the pinned-on, not-quite-finished appliqué-sashiko wall hanging that I started in Sylvia's class.  I have some plumeria leaves floating down a stream.


To begin, we started by tracing the drawing of the flower we wanted onto tracing paper.  We then traced that onto plastic mylar which is heat-resistant so we could iron on it.

We did a sort of "exploded view," so that each petal was independent on the mylar.  The individual petals were carefully cut out so that the mylar was left intact.  That allowed us to use the mylar to fussy cut the fabric for the individual petals.


For now, just look at the top two "flowers" on my mylar sheet above.  As you can see, the top flower's petals are smaller than the middle flower's petals.  That is because we needed a template for both the flower and the "lip" of the flower.  The lip is the differently-shaded part on the edge of the petal.  You can see in the close-up below the two different parts of each petal.  (These petals are not sewn down yet, which is why there are a few rough edges.)


Look at all these petal pieces I acquired.  I made two different sizes of plumeria so I needed lots of templates.


We used these templates to cut out our pieces of fabric, adding about a scant 1/4" around the edges.  Then we used starch and a small craft iron to iron the fabric around the edges of the mylar.  Note that this is heat-proof mylar, which doesn't melt when you iron it.

For the flower below I didn't need to make a separate pattern for the "lips" of the petals because I found the perfect fabric.  It had nice curved, wavy striations going through it, so I fussy cut the fabric to get my flower petals + lip/edge all at once.


After the petals are cut and then glued together to stabilize them, they need to be sewn together.  The main petal part gets appliqued to the lip/edge pieces.  Sylvia introduced (most of) us to a thread called Invisifil, made by WonderFil.  It is a very fine thread that practically disappears when used for hand appliqué.  I'd never used it before, but I love this thread!  All of us in the class loved it!  That explains why a lot of us went over to the little fabric shop (specially set up for the Empty Spools classes) and bought lots of little "six-packs" of Invisifil thread in all sorts of beautiful colors.


You really should go over to SisterStitches blog, Emmaline Design.  She made quite a few posts about our stay at Asilomar.


Sunday, March 31, 2013

Asilomar with SisterStitches

I just returned from almost a week at Empty Spools Seminars at Asilomar Conference Grounds in Pacific Grove, CA. I've been there before, and they have some truly awesome classes.  It is really a wonderful experience.  But this time it was even better because SisterStitches came with me! 


Doesn't she look relaxed sitting on the deck of our room!?!  We had a great time together, and we each chose the same class, too.  We were in Sylvia Pippen's class on Japanese sashiko and appliqué.  Check out Sylvia's website because there are fabulous pictures there.  She does incredible work.  And Sylvia is also a great teacher.  Lots of fun, fairly laid back, and really good at instruction.


Here is my work in progress.  I need to make some more flowers to applique, but you get the idea.  I already have the water pieces appliqued onto the backing fabric (which is a dark blue Moda marble).  The white lines are where I will do sashiko stitching.  The idea is plumeria flowers floating down a stream.  I'll let you see more of it as I progress in my work.


SisterStitches chose to work on two different designs.  (She's an over-achiever!)  The one above is very pretty appliqued waves, and you can see that she has started her sashiko stitching.


This pretty moon (or sun) belongs to SisterStitches, too.  She has begun her stitching on the waves, which will build up and splash in front of the setting sun (or rising moon).

While we've both done applique and embroidery before, neither of us had tried sashiko (although I've always wanted to and have had the materials for quite a few years now!).  The sashiko stitching is different from regular embroidery, as the stitches are larger, and each stitch has a space between it and the next.  You can see that a little bit in my practice piece below.


And here is one of the many deer that were around the Asilomar grounds.  They are actually quite used to people being around, so they don't scare very easily.  I still wouldn't want to get too close, though!

Isn't he sweet-looking!?!