Wednesday, December 4, 2019

Another New Comforter Cover!


I recently made another comforter cover, for a different bed.   I used spare sheets to make it.  

For some reason, it makes me a little nervous to make things like this.  I end up measuring once, twice, three times or more, saying a prayer, crossing my heart, and anything else that I think might possibly help me avoid making a big error!  I guess I'm reluctant to cut into extra large pieces of fabric like this.


I wanted the cover to sort of echo the painting in the room, so I made the balance of the stripes lean toward the darker blue on the left side and toward the lighter blue on the right side.  I'm happy with the result.


The pillowcases included in the sets are king size, and our pillows are regular size.  So I plan to "shorten" the large cases down to normal size, and use the leftover pieces of fabric to sew a contrasting strip to the new pillow cases.

Sunday, November 3, 2019

Making Some Special Cards

 I've had a card-making kit lying around for several years now (I know--embarassing!), and there was always one reason or another not to make the cards.  But I finally did!  They combine quilting and cards--what could be better!?!

Here are the results--all heart cards.  The kit included the cards with the cutouts.  I supplied everything  that is not paper!  


The instructions said to layer fabric, batting, and a piece of paper, then to zig-zag them to the cards.  Here you can see the back of one card, after I have removed the paper and cut the excess fabric/batting away.


And in this photo you can see that the cards have two folds in them, so one side gets glued over the messy back-side of the pretty hearts.


I chose the fabrics and accessories, and I couldn't be happier with my new cards! 


Wednesday, October 30, 2019

"Square Dance" Quilt for Challenge

 This is my original drawing of how I wanted this quilt to look.  I'm not sure what this "progression" of squares is called, or even if it has a term.  But I knew that I wanted my "one red square" to be in the center, and then angle the other squares around it.


The progression of my drawings. . .


. . . to the final drawing, which I took to the copy shop to have enlarged.  


When I brought home my extra large version of the pattern, I traced those pieces onto freezer paper.  I ironed the freezer paper onto the fabric, and cut 1/4" away from the edges to make my fabric pieces.


I found that I needed to label the pattern pieces (N, S, E, and W) just to keep them straight to myself.  Theoretically, all of the orange pieces are the same, all of the blue pieces are the same, etc.  But labeling them helped me to keep everything where it was supposed to be.  It's not the easiest thing in the world to sew large pieces of fabric together and keep the freezer paper on them!  The whole thing is about 3 1/2 feet square.


I decided that I wanted to quilt one big spiral on this quilt because it is so angular.  I've always liked the look of spiral quilting, but have never done it.  I searched on Pinterest for instructions and found some good ones.  The source was Flourishing Palms, and the instructions were very thorough.  (Thank you, F.P.!)


I started by drawing around a quarter with a white chalk marker, just as Flourishing Palms directed. Not all of my stitches are perfect, but all in all I'm very pleased with them.


Getting to the bigger, outer circles was a snap!  Frustratingly,  the very center circles were the hardest to sew, and also the first ones I sewed.  And those inside circles will probably also be more noticed than the easier, neater, outer quilting lines.


When I got to the edge of the quilt, I had to lift my presser foot and "travel" to the next corner to get all the corners filled in.


And here is the finished quilt.  I debated about how to bind it--basically I was going between pink binding and black binding.  In the end I decided to do a faced binding.


Saturday, October 5, 2019

"One Red Square" Quilt Guild Challenge

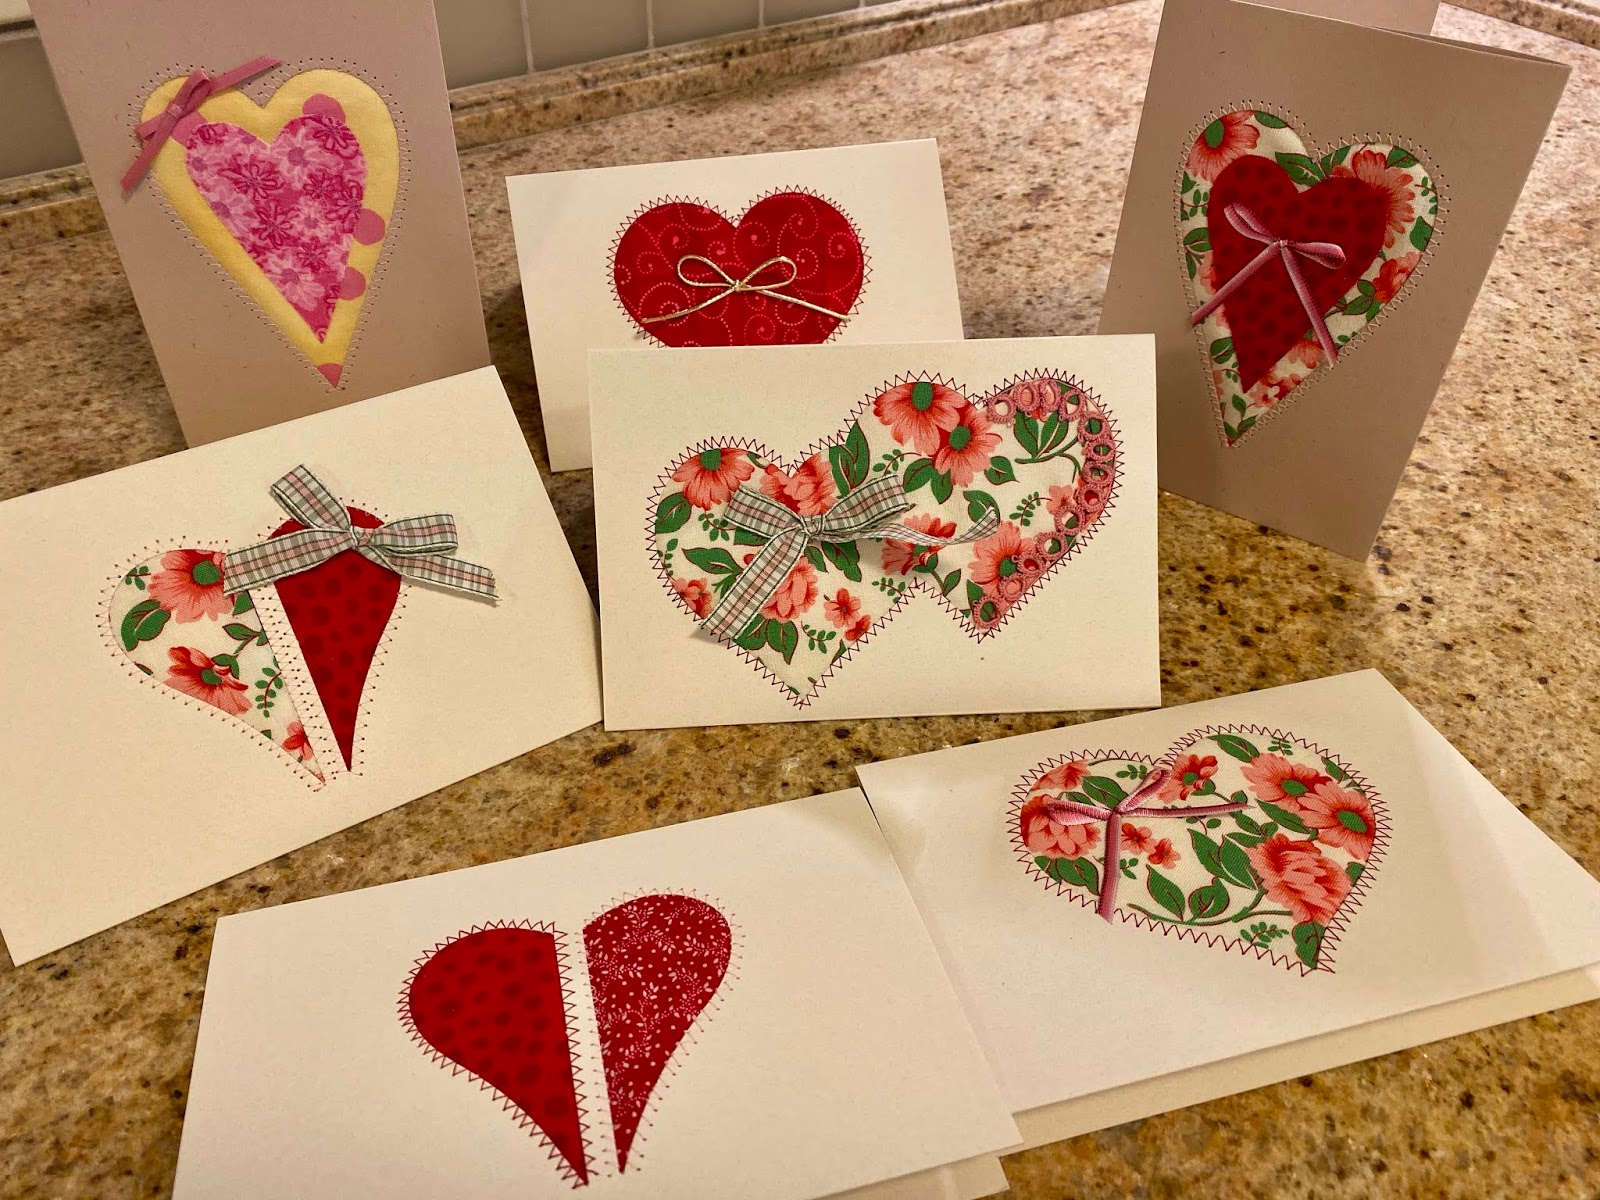
I think I mentioned that our guild's challenge theme for this year is One Red Square.  Anything we enter must contain one red square.  Not two squares or more, just one red square.  I came up with LOTS of ideas for this challenge!  And I carried through on most of them!

There is a large white barn near where I live.  It is the only barn in the immediate vicinity.  And it is called (wait for it. . .) The White Barn.  Every time I drive past it I think, "That barn really needs a barn quilt on it."  So with this challenge, I was able to produce a barn quilt on my very own 
White Barn.  


I used a technique which I have used in the past called Fabric Confetti.  I took a class a few years ago at Asilomar (Empty Spools) from Denise Oyama Miller and Nancy Ryan.  Here's the process in a nutshell.  First I cut the fabric pieces into "confetti."  Fast back and forth with the rotary cutter accomplishes this.  The backing fabric and batting are laid down on a surface, and the colored confetti pieces are laid onto the batting to form the picture.  

When that is finished, a layer of black tulle is (very carefully) laid down on top, being careful not to move the fabric pieces.  Then it gets safety pinned really, really close together to baste it all and to hold the tiny pieces in place.

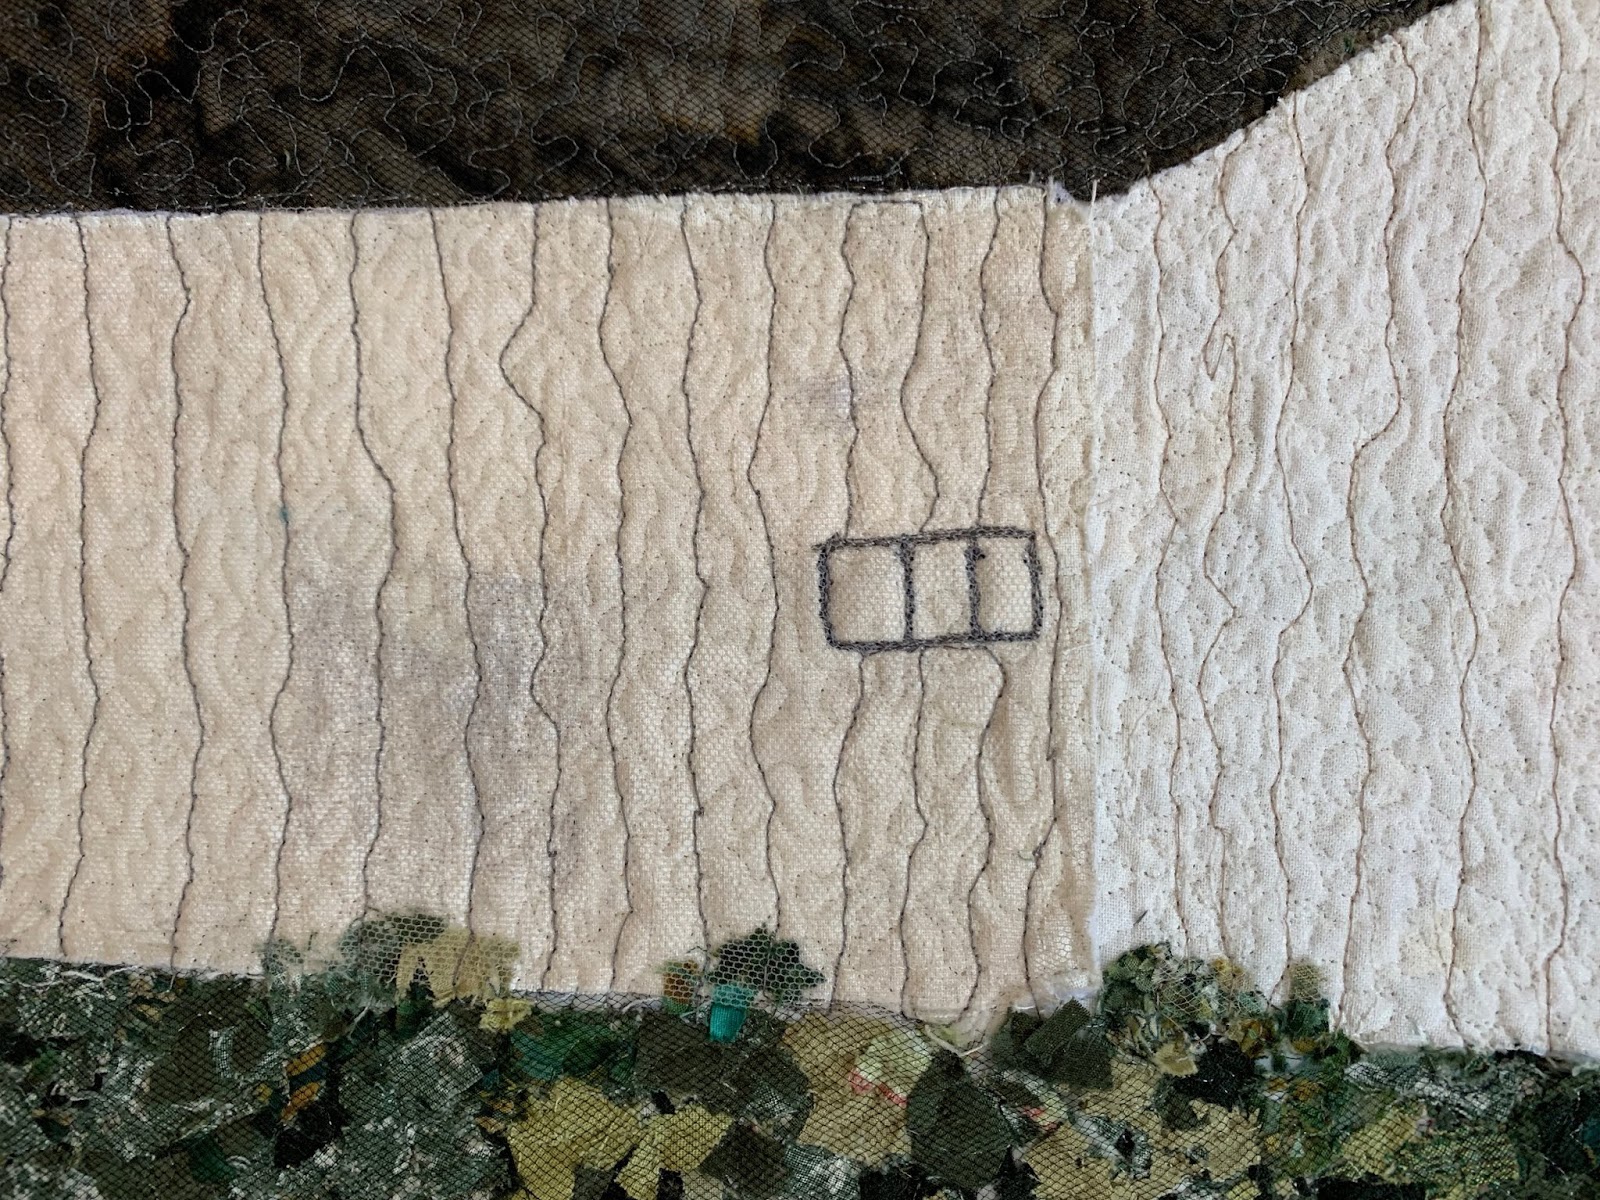
The next step is to stipple the * out of it, using invisible thread.  That holds everything in place.  Here you can see the quilt in the midst of being quilted down.


After I did that, I laid down the white fabric pieces for the barn itself.  In the photo below you can see that I've made some "barn board" lines in the barn, as well as tiny stippling.


When that was done, I had some fun laying down brown tree trunk pieces amidst the greenery.  I added a fence, which appears in that part of the scene.  I had the very edges of the quilt turned over and pinned for two reasons.  One is so I didn't "leak" any more pieces of fabric onto the floor!  There was already enough of that!  And the other reason is to minimize the risk of getting the edge of the quilt folded over underneath where I was quilting.  Yes, I did do that, and had to rip out some very dense quilting I had done over a tree trunk.


This is just a tiny sample of what the floor looked like, as well as the clothes I was wearing.  Little tiny fabric pieces everywhere!


Here's a close-up of part of the barn, where you can see the two slightly different colors I made the barn to give an impression of shadows.


I created some pink "Naked Ladies" and yellow dandelions and tall grasses in the foreground.  Naked Ladies are properly known as amaryllis belladonna.


Friday, October 4, 2019

A New Comforter Cover

Our comforter cover was really, really showing its age (don't we all!!), and I knew it had to be replaced.  Several years ago I had sewn this strip of blocks together, because I wanted to understand the process.  Here are the basic instructions for making this type of strip.  It has hung around for quite a while, patiently waiting to be used.


It worked perfectly as a "strip of interest" on a comforter cover.  (Is this supposed to be called a duvet? Or is the duvet the comforter that is inside?  I'm really confused by these words.)  I used a spare sheet that I had, and after measuring carefully, I just top-sewed the strip to the sheet. 


You can see that I used the top of the sheet for the bottom of the comforter cover, so it has a nicely finished hemmed edge.  I hand-sewed extra-large snaps to the bottom of the cover to close it.


Monday, August 26, 2019

Recent Work

I'm afraid I've neglected my blog recently, but it's mainly because I've been so busy sewing!  So this blog post will be "short and sweet" so I can get back to my sewing.  #notaddictedtoquilting

Here are a few of the things I've been working on.

While watching Giants games in the living room with MisterStitches I've been cutting out aprons for TwoFish Baking Company.  Here Cassie is inspecting them.


On Saturday I started a new quilting project, one involving the "fabric confetti" method.  The whole quilt won't be confetti; I'll be adding some appliquéd shapes too.


Finished up this cute little Christmas tree ornament for my quilt guild's fundraiser sale on Thanksgiving weekend.  Isn't it cute!!??!


Added some appliqué flowers to my green denim jacket.  I guess I should do a whole blog post about that jacket, to show you all the treasures it holds.  


Here is a closer photo of the embroidered flowers.  I found a new way to embroider a flower on Pinterest:  the two red flowers.  I think they look a little like roses.


 I finished quilting a spiral on this quilt for our quilt guild's challenge show in October.  I found a great entry on Pinterest that gave very detailed instructions on quilting a spiral, and it was very, very  helpful.


And I finished crocheting another baby afghan.


Monday, August 5, 2019

Upcycling Art Exhibit

At our local Gualala Arts Center there was an Upcycling Art Exhibit in April.  And here is what I entered into the show.


I make a lot of dog/cat beds, as you know.  So I thought I would "class one up" a little bit for this show.  Taking a discarded shirt of MisterStitches, I cut a large rectangle out of it for the body of the dog bed.  Then I sewed up the placket so it would be "sealed."  I rather roughly embroidered "Bow Wow" onto the shirt front.  If I had thought about it for even a little bit, I would have remembered to put some interfacing or another piece of fabric under the embroidery.  But I forgot about that.  So the words are slightly gathered.  I doubt if any animals will mind that!  

I stuffed this shirt full of discarded quilting scraps, then sewed up the opening.  Someone suggested to me that I should take the buttons off, so a dog won't bite them off.  And I fully agree with that, so off came the buttons!  All ready for a doggie to snuggle in. 

Friday, July 26, 2019

A Teacup Pincushion

I was given a pretty little teacup by my friend, Sandy.  What to do with it. . .  What to do with it. . .
Then it hit me--a pincushion!

I chose some fabric from my scraps.  I wanted to match the pretty greenish-tealish color on the teacup but I didn't have that color in my scraps. So I went with one that I thought looked slightly old-fashioned.


I squished up some polyester fiberfill and stuffed it in the cup.  Then I added more and more, always squishing it down.  I kind of wrapped my fabric piece around the wad of fiberfill, and placed it in the cup.  My hot glue gun was all ready to go!

But it didn't seem to work very well.  So I hopped on over to Pinterest and searched for teacup pincushions, as I knew someone else had done this before!  And yes, thank you, Thoughts and Thimbles, for the tutorial.  Shannon (at Thoughts and Thimbles) told me to run a gathering stitch around the outside of my circle (of course--why didn't I think of that!?!), then stuff it full of fiberfill and draw the threads up to close it.  Oh, and my fabric circle was too small (just a little bit) so I cut another one.  Much better this time.  Shannon also told me how to add a button.  I probably wouldn't have thought of that, either!

I ran a bead of hot glue around the inside of the teacup rim, then placed my wadded up fabric "ball" inside.


Et voila!!  My pretty little teacup pincushion.


Wednesday, July 17, 2019

Red Square Challenge


The theme for my quilt guild's challenge show this fall is "One Red Square."  The quilt can be anything, but it has to include one red square.  It cannot contain two or more red squares.  My little brain has been flooded with ideas for ways to use One Red Square in a quilt.  Here is one idea I had.  A red square in  the center, then another shifting square around it, then another shifting square around that, etc, etc.  I drew it out and used crayons to experiment with color possibilities. 


I used graph paper to make the squares, and cut them out to place them one on top of each other.  When I had it like I wanted, I took it to a copy shop and had it enlarged so that it's 30 inches square.


The large copy was perfect for tracing pattern pieces onto freezer paper.  I was then able to iron the pattern piece to the fabric, and measure and cut 1/4" around all four sides.  I found some really vibrant batik fabrics to use for the surrounding squares.


This is what it looked like (from the back side) when it was almost all sewn together.


 Now I'm wondering what kind of border to put on it.  Black?  Matching pink?  Another color?  No border?


And also, what to do for quilting?  I'm thinking maybe one big spiral starting in the center.

Friday, July 5, 2019

A Class on Dyeing

Our guild had a class in fabric dyeing in March.  It was offered as a "non-messy, non-toxic" method of dyeing.  Dyeing which could maybe be fairly easy to do on our own.  Our teacher, Jennie Henderson, showed us several different methods.  (Jennie is a superb "fiber artist," dyeing fabrics and clothing and weaving beautiful things on her looms.) The first day we learned about ice dyeing, or snow dyeing, if you live where there is snow.  We first soaked our fabric (actually we were dyeing fabric shopping  bags, which Jennie provided) in a mixture of water and washing soda.  Then we scrunched up and twisted the fabric before placing it on a rack inside of a plastic "wash pan."  We placed quite a few ice cubes on top of the fabric bags, then sprinkled just tiny amounts of Jennie's dye powder onto the ice.  It immediately started melting, causing the dye to liquify and come into contact with the fabric.  Depending on which colors we chose and where we placed the color, the bags became beautiful multicolor masterpieces!

MomStitches was visiting me, so we took the class together.  Here is her bag getting melted and colored upon!


And here is my bag in process.


We both put our fabric bags in the same container, knowing that they would probably touch each other and blend the colors even further.  They sure did!


It was a fun day with lots of coloring experiments.

Tuesday, July 2, 2019

I Really Can Finish A Project!

Wow!  It really is possible!  Sometimes I feel like I'm drowning in UFOs.  Lately I have been quite a little bit reluctant to start something new because of all my UFOs.  I was recently reminded of this by way of a fun Disney Cruise we took to Alaska with SonStitches, Dear Daughter-in-LawStitches, BabyStitches, and DaughterStitches, Dear Son-in-LawStitches, and GranddaughterStitches.

Our first port stop was Skagway, a cute little town.  Rushin' Tailor is a quilt shop in Skagway.  I think it was three years ago when we last visited Alaska and I found this shop.  So last week I walked from the ship to the downtown area and browsed around in this very nice quilt shop.  And I found a really nice kit that was a depiction of a whale tale (complete with beads) just before it returns to the water.  Yup, I had bought that kit three years ago and  yes, you guessed it--I haven't completed (or even started) the kit yet.   :-(

 This time I found another cute little kit and it looked kind of fun for hand sewing.  It included everything I needed, including two kinds of thread, a needle, hexie papers, felt, and ten squares of fabric, so that I could have a choice of which seven to use.  They even gave me two straight pins to use! I had to supply a scissors, but that was it!


It didn't take me very long to baste the hexies, hand sew them together, sew them onto the felt, trim the felt, and finish it off with blanket stitch.  And now I have a nice little mug mat, or whatever it wants to be called!

Thursday, May 16, 2019

Birthday Number Shirts For GranddaughterStitches

GranddaughterStitches turned eleven earlier this month!  I made three different shirts for her this year.  

The first one, in pink, has the number near the bottom hem.


The second one has the number on the back, like a sports jersey.


And the third one is a different style of shirt, with some cute ruffled sleeves.


I always have such fun making these shirts!  It's fun to choose different fonts for the numerals, different shirts to use, and different fabrics for the numerals.  And also, it's just such a joy to know that GranddaughterStitches is growing up, gaining more knowledge and skills all the time, and becoming even more wonderful with every year.
{heart, heart, heart}