Showing posts with label Harmony Art. Show all posts

Tuesday, December 8, 2020

Fabric Shopping Bags--Where Have They All Gone?

I count it as just one more tiny sad thing about this quarantine period.  But we are not able to use our fabric shopping bags.  And I fully agree--I'm not arguing the point.

So while my shopping bags are unoccupied, shall we say, I decided it was a good time to wash all of them.  Here are some of the bags.


Most of these bags are courtesy of the Green Bag Lady.  Teresa has changed the world, I believe, by giving away thousands upon thousands of fabric bags.  All over the world.  You can visit her website here..


This bag is not actually from GBL, although I used her pattern to make it.  I love it because it is made from fabric by Harmony Art.  It's a nice sturdy fabric, too.


I'm pretty sure that this next one is the first bag I ever received from GBL.  It, too, is made from Harmony Art fabric, a very cute little child's alphabet design, with cute little words spelled out in the grid.


And here is its number.  Each bag is numbered and kept track of at the GBH Headquarters.  This bag is number 5,349, fairly early on in the production history.


This is another beautiful Harmony Art print, this time a very pretty polished cotton which has a luxurious feel to it.


Then there's this bag, from the year of Nashville's flooding.  (Can't remember the date.)


This is its number, though, #10,332.


Further on in the progression of bags given away/number of bags.


I count myself fortunate to have had the privilege of working with Teresa, just a little bit, by helping to hand out bags at grocery stores with her and with her "Bag-ettes."


This is my most recent bag (which is the polished cotton shown above), #55,545, which is a great number, don't you think!  The number of bags that have been made to date is about 70,000.  Isn't that fantastic!


So, whenever we do get to emerge from our lairs, I will have nice clean fabric bags to use.  Thank you, Harmony and Teresa!

Sunday, May 17, 2020

Scrappy Strip-Pieced Star Quilt (Part 2)

Part 1 of this post can be found here

After getting the squares all sewn together in (hopefully) the right direction (!), I thought about what I could use for a border.

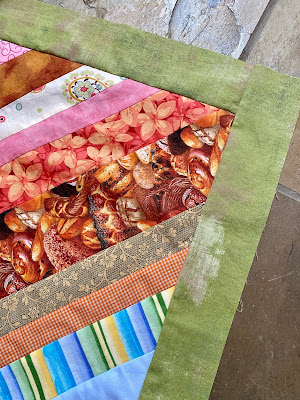
After auditioning several fabrics, I chose a light green grunge fabric for the borders.  At this point my quilt top measured about 76" square. 


Then, as I searched through my stash for some fabric for the back, I came across this yummy piece of Kaffe Fassett.  It was not quite wide enough for this quilt back.  But it was long enough so I decided to start with the KF fabric, and add to it.


More strip-piecing came to the rescue!!  I knew that I needed to add about 15" on each side of the KF fabric to make it wide enough for the backing.  I found some unbleached muslin that was just the right size for a foundation, so I started some more stripping!


Adding strips to the muslin fabric, and then pressing each strip down.

This is one of the long strips that I sewed to add to the backing fabric.  I made two of these strips, one for each side of the quilt back.


As I'm sewing along on this project of scraps, it's really interesting to "travel along memory lane" as I come to fabrics that I have used in the past for other projects.  Some are real favorites.  Here are a few.

This is some wonderful "bread fabric" that I found and used for aprons at TwoFish Baking Company.


The pretty blue floral here was the main fabric for my President's Quilt.


The green print in the center is some of HarmonyArt's organic cotton.  Along with a favorite 
orange-ish gingko leaf batik.


And here you can see a glimpse of the green fabric that I used to make "potholders" for Christmas gifts last year!


The beautiful green floral in the center is a lovely fabric, a smooth and silky cotton, reminiscent of a Liberty of London fabric.


Below is another pretty pink HarmonyArt fabric, alongside some Winnie The Pooh fabric that I used to make a quilt for GranddaughterStitches quite a few years ago. 


The purple grape fabric is from some table napkins that I made a long time ago, and the green pea fabric is from a baby quilt that I made for BabyStitches just three years ago.


Looking through your fabrics can be a walk down Memory Lane!

Tuesday, November 6, 2018

Green Bag Lady Bag

One of the blogs I follow (see right-hand column of my blog) is the Green Bag Lady.  This remarkable woman has given away over 53,000 fabric shopping bags.  Isn't that incredible!!  She's also a nice person, as I've come to know her a little bit through her visits to my part of the country.  And I have helped to give out quite a few of her bags, which is always fun!


Each bag has its own number.  Here's my number!

I have several of GBL's bags, and I've also used her super-simple pattern (located on her blog) to make some bags of my own.  Some I've given away and some have been for myself.  But when I saw recently that GBL was having a give-away on her blog of bags made from Harmony Art fabric, I just had to put in my name in the hopes of receiving one of the bags.  I also count Harmony as one of my friends, and the fabrics she designs are incredibly beautiful.  Both in look and in feel!


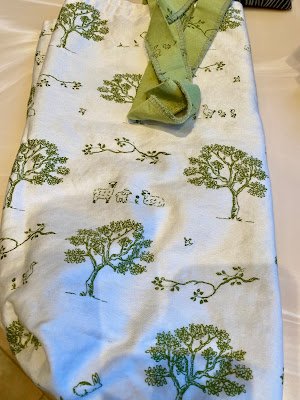
And guess what!  My wish came true!!  I received an email from Bagette Dad, asking for my mailing address.  And this beautiful bag is what came in the mail to me!  Isn't that fabric beautiful!  


The design is called Animal Farm.  I just love the little animals pictured.  Love, love.


So check out The Green Bag Lady's blog and website.  She's doing some great work, besides making pretty things!!


Tuesday, February 20, 2018

Retreat 2018

Wow, it has been a long break I've taken here from blogging!  I was kept pretty busy during January rehearsing for a mystery play, written by MisterStitches himself!  It was done locally, at Gualala Arts Center, as a dinner theater.  One scene was performed, then people were given appetizer, then another scene, followed by a salad, yadda, yadda, yadda.

That was a very busy time, with rehearsals every day and sometimes on weekends.  We had lots of visitors for the play, too.  DaughterStitches and family (3), SonStitches and family (3), MomStitches (1), and some friendStitches (2).  (Did that last thing work?!?)

Immediately after the play--the very next day--MomStitches and I left for my guild's annual retreat, held in beautiful downtown Healdsburg, at a very nice hotel.  It was fun having MomStitches with me this year.  So along with the play, I had a lot of work to do getting the retreat ready, too.  I would set my timer for 30 minutes and practice my lines.  Then I'd set it for 30 minutes and work on retreat stuff.  Repeat, yadda, yadda, yadda.

I took some preparatory pictures, mostly of the car as MisterStitches had packed it for us, so we would be able to get everything back into the car for the trip home.  


As you can see, just about every square inch of space was used.  And I'm very glad I took these photos, as they definitely helped us pack the car for the trip home!


Here is a photo of the 24 of us together, just before dinner on the last night.  (I'm actually missing one person, in case you counted, as she had to leave early.  Next year, note to self to take group photo on a night when everyone is there!)


This is one of the projects I worked on at retreat.  Quilting this comfort quilt.  I had found these blocks already sewn, in our guild's fanny basket.  So I put them together, added a couple borders and did the quilting at retreat.


Of course, I forgot to take photos of most of the little personal touches I provided at the retreat, like the pretty ribbon bookmark/paper clips, and the signs labelling each table as "Jan's Creative Space."  They liked those.  And I also had some print-outs placed in various places around the room, and I do have photos some of them.


I usually have some optional projects for people to work on at retreat, if they feel like it.  The first one was this apron made out of a man's shirt.  Some of the people made these.


And this is a quick quilt-as-you-go table runner. 


More Later!!!

Sunday, October 16, 2016

Aprons for the Bakers

Time to make some more aprons for my favorite bakers, Margaret and Hilla at Two Fish Baking Company.  Once I got started, I couldn't stop!  

.

So I ended up making six of them this time.

I really enjoy making these aprons.  It's fun to go through my stash and find two fabrics that will "play well together" for each apron.


The apron below uses some of my Harmony Art organic fabric, "40 Ginkgos." And it was lined with fabric that I used for sashing strips on my President's Quilt.


Harmony Art fabric was also used for the apron on the left, "Whispering Grass" in orchid.


Is it ironic that I never make an apron for myself?  I almost always wear an apron when I cook or bake, but they are the plain white ones that I buy at the restaurant supply store!


* * * * *

By the way, I've added a new "gadget" to the right sidebar of my blog.  It is to enable you to sign up and receive my blog posts by email, if you so desire.

Saturday, March 26, 2016

My Portable Ironing Board

This is a project that I've been wanting to make for a while now.  We had a small tv tray (is that what other people call them?!?) whose top had seen better days.   MisterStitches wanted to get rid of it, but I knew that I wanted to re-purpose it.


First of all, for my fabric I chose Whispering Grass by HarmonyArt.  Choosing the fabric did take a little thought.  I knew that I wanted a print, but nothing too bright.  Certainly not a red fabric which might bleed onto whatever I was ironing!  Whispering Grass, as are all of Harmony's fabrics, is organic, and it's such a pleasant print.


I used one layer of batting and one layer of Insulbrite to cushion the fabric.  I simply cut the fabric and both battings a few inches bigger than the tray.  Then it was time to call in the staple gun!  I started by stapling in the middle of one side, then stretching the fabric tight and stapling in the middle of the opposite side.  Repeated for the other two sides, then I stapled all around the edges.  It was important to keep the fabric stretched while I was doing this.


I just did a sloppy sort of miter at the corners.  It did the trick!


The bottom of the tray is not going to win any beauty prizes.  No finished edges.  Uneven edges.  Questionable corner treatment.  But, ask me if I care!!

I love my new little ironing table.  I took it to our guild retreat with me in February and got lots of compliments on it.  In the past I've always taken my small ironing surface with me to classes, etc.  It works fine, but this way I can free up a little bit more of my table space.  Besides, it's very pretty!


Friday, March 4, 2016

PPQG Retreat 2016

Our annual guild retreat was held during the second week of February.  We had a truly wonderful time.  There were 25 of us.  A good number. 


I wish I had taken more photos of our work room (aka sweat shop!).  We stay at the Dry Creek Inn Best Western in Healdsburg.  It is a very nice hotel with great amenities and employees.  This is the 5th or 6th year we have been here and we love it.  Our workroom is a large conference room (above).  Each person has a long table to work on.  They provide irons and ironing boards, and there is always coffee, tea, and water available.


A lot of great work gets done here, like this beautiful quilt above with purples and blues.  Lots of Harmony Art fabrics!


Here's a great triangle quilt top.


We even had live entertainment!  One of our quilters brought her guitar and played/sang wonderful music for us during our nightly happy hour.  Another quilter brought her ukulele and she provided us with lovely music, too.


I like this deceptively simple quilt with square patches, offset by uneven rail fence blocks.


Here's a real stunner.  Three-dimensional flours cascading down this beautiful quilt.


Here is some of what I worked on.  These are patches made with my father's shirts.  I was playing around with placing them on point on my design wall, just to see how it would work.


And I think this is the best idea I have ever had!  I asked every participant to bring two four-patch blocks with them, made with red, white, and/or blue fabric.  Each of the four squares measured 6" square to start with.  After we got to the retreat I gave them directions of make a disappearing four-patch.  Now they will all be put together to make a Quilt of Valor.  The above photo shows just some of the blocks made, but we have 49 altogether.  That will make a quilt top 6 blocks by 8 blocks, plus one on the back for the label.