Friday, July 26, 2019

A Teacup Pincushion

I was given a pretty little teacup by my friend, Sandy.  What to do with it. . .  What to do with it. . .
Then it hit me--a pincushion!

I chose some fabric from my scraps.  I wanted to match the pretty greenish-tealish color on the teacup but I didn't have that color in my scraps. So I went with one that I thought looked slightly old-fashioned.


I squished up some polyester fiberfill and stuffed it in the cup.  Then I added more and more, always squishing it down.  I kind of wrapped my fabric piece around the wad of fiberfill, and placed it in the cup.  My hot glue gun was all ready to go!

But it didn't seem to work very well.  So I hopped on over to Pinterest and searched for teacup pincushions, as I knew someone else had done this before!  And yes, thank you, Thoughts and Thimbles, for the tutorial.  Shannon (at Thoughts and Thimbles) told me to run a gathering stitch around the outside of my circle (of course--why didn't I think of that!?!), then stuff it full of fiberfill and draw the threads up to close it.  Oh, and my fabric circle was too small (just a little bit) so I cut another one.  Much better this time.  Shannon also told me how to add a button.  I probably wouldn't have thought of that, either!

I ran a bead of hot glue around the inside of the teacup rim, then placed my wadded up fabric "ball" inside.


Et voila!!  My pretty little teacup pincushion.


Wednesday, July 17, 2019

Red Square Challenge


The theme for my quilt guild's challenge show this fall is "One Red Square."  The quilt can be anything, but it has to include one red square.  It cannot contain two or more red squares.  My little brain has been flooded with ideas for ways to use One Red Square in a quilt.  Here is one idea I had.  A red square in  the center, then another shifting square around it, then another shifting square around that, etc, etc.  I drew it out and used crayons to experiment with color possibilities. 


I used graph paper to make the squares, and cut them out to place them one on top of each other.  When I had it like I wanted, I took it to a copy shop and had it enlarged so that it's 30 inches square.


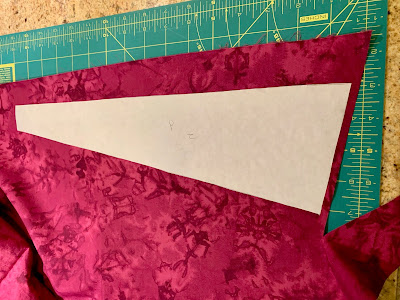
The large copy was perfect for tracing pattern pieces onto freezer paper.  I was then able to iron the pattern piece to the fabric, and measure and cut 1/4" around all four sides.  I found some really vibrant batik fabrics to use for the surrounding squares.


This is what it looked like (from the back side) when it was almost all sewn together.


 Now I'm wondering what kind of border to put on it.  Black?  Matching pink?  Another color?  No border?


And also, what to do for quilting?  I'm thinking maybe one big spiral starting in the center.

Friday, July 5, 2019

A Class on Dyeing

Our guild had a class in fabric dyeing in March.  It was offered as a "non-messy, non-toxic" method of dyeing.  Dyeing which could maybe be fairly easy to do on our own.  Our teacher, Jennie Henderson, showed us several different methods.  (Jennie is a superb "fiber artist," dyeing fabrics and clothing and weaving beautiful things on her looms.) The first day we learned about ice dyeing, or snow dyeing, if you live where there is snow.  We first soaked our fabric (actually we were dyeing fabric shopping  bags, which Jennie provided) in a mixture of water and washing soda.  Then we scrunched up and twisted the fabric before placing it on a rack inside of a plastic "wash pan."  We placed quite a few ice cubes on top of the fabric bags, then sprinkled just tiny amounts of Jennie's dye powder onto the ice.  It immediately started melting, causing the dye to liquify and come into contact with the fabric.  Depending on which colors we chose and where we placed the color, the bags became beautiful multicolor masterpieces!

MomStitches was visiting me, so we took the class together.  Here is her bag getting melted and colored upon!


And here is my bag in process.


We both put our fabric bags in the same container, knowing that they would probably touch each other and blend the colors even further.  They sure did!


It was a fun day with lots of coloring experiments.

Tuesday, July 2, 2019

I Really Can Finish A Project!

Wow!  It really is possible!  Sometimes I feel like I'm drowning in UFOs.  Lately I have been quite a little bit reluctant to start something new because of all my UFOs.  I was recently reminded of this by way of a fun Disney Cruise we took to Alaska with SonStitches, Dear Daughter-in-LawStitches, BabyStitches, and DaughterStitches, Dear Son-in-LawStitches, and GranddaughterStitches.

Our first port stop was Skagway, a cute little town.  Rushin' Tailor is a quilt shop in Skagway.  I think it was three years ago when we last visited Alaska and I found this shop.  So last week I walked from the ship to the downtown area and browsed around in this very nice quilt shop.  And I found a really nice kit that was a depiction of a whale tale (complete with beads) just before it returns to the water.  Yup, I had bought that kit three years ago and  yes, you guessed it--I haven't completed (or even started) the kit yet.   :-(

 This time I found another cute little kit and it looked kind of fun for hand sewing.  It included everything I needed, including two kinds of thread, a needle, hexie papers, felt, and ten squares of fabric, so that I could have a choice of which seven to use.  They even gave me two straight pins to use! I had to supply a scissors, but that was it!


It didn't take me very long to baste the hexies, hand sew them together, sew them onto the felt, trim the felt, and finish it off with blanket stitch.  And now I have a nice little mug mat, or whatever it wants to be called!