Saturday, March 28, 2020

"Un Paper" Towels

Let me first of all say that this project has nothing to do with the Coronavirus.  It is something that I'd been seeing on Pinterest, and decided to try.  It is, of course, very timely, given the state of the world and paper products.

 I ordered some white flour sack towels from Amazon.  I cut them into smaller sizes and zig-zagged the hems where needed.  You can just barely see the yellow zig-zag stitches in the photo below.


Also, according to Pinterest, I should have a cute little basket, or bin, or fabric basket to keep these in on my counter.  We're not there yet!  For now they are in a stack!


Some of the Pinterest ideas say to back the towels with flannel, as I've done in the photo below.  Some said to back the cloths with terry.  I tried one like that, and it was a bit too thick for my taste.


Some of the towels are two layers (like the one below), and some are just one layer.  The size is approximately 12" square.  I have to tell you, MisterStitches likes these towels A Lot.  I like them a lot, too.  I think we both prefer the simple one-layer towels.

I bought quite a few of these (!) and I'm not finished cutting and zig-zagging edges yet!


And then, of course, I needed a place to put the used towels.  So I came to another project:


Hanging Bag For Used Towels.


I found a nice tutorial at this website.
https://diydanielle.com/how-make-kitchen-wet-bag/

But I didn't follow it exactly.  I used it as a sort of jumping off place to make my own "laundry bag."


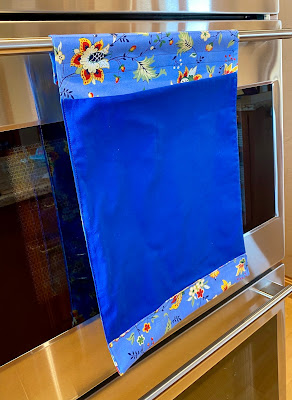
Danielle used oil cloth to line her bag, but I didn't have any of that, and I didn't really want to bother with it anyway.  (If they are too wet, I hang them over the other oven handle till they're dry.)  So mine is just two thicknesses of the solid blue, attached to the two layers of the blue print.


You can almost see here the velcro strip across the back to hold the bag on the oven door.


Here is the bag almost full of used towels.  Time to do laundry!


Tuesday, March 24, 2020

A New Bag From Scraps!

While at retreat, someone turned up with some upholstery fabric samples.  As it's hard for me to throw anything away (did I just admit that out loud?!?) (But seriously, if I can't use it, I can always put it in a dog bed.), I brought the samples home with me.  After trimming off the paper label end, I had some nice rectangles.  So I used up eight of them to make a tote bag.  


I even boxed the bottom corners, to give the bag some dimension.  

As there were unfinished seams inside, I decided it needed a lining.  I used the bottom of a black San Francisco Giants t-shirt for the lining!  (I tried to take a picture, but a photo of black?  Doesn't work so well.)

And the handles are from a piece of leftover bedsheet fabric.

Below is the other side the tote.


These shots show the pretty pattern of the fabric.


There are some more upholstery fabric squares, so maybe I'll make another one of these!

Tuesday, March 17, 2020

Scrappy Strip-Pieced Star Quilt (Part 1)

 I've always wanted to do a strip-pieced quilt to use up my odds and ends of strips.  What got me in gear was cleaning/sorting things in my studio.  I came across my strip bin.  Which contains very well-sorted and labeled strips of fabric.  I had one baggie for 1 1/2" strips, one for 2" strips, one for 2 1/4" strips (because you can make these into scrappy quilt binding), and on and on.  Very. Well. Sorted.

So I took all those strips and divided them into only two categories: lights and darks.  And I started on my squares.  I used some tissue paper that I had on hand.  The roll is 18" wide, so I cut 18" squares.  I drew one diagonal line on the square and took off from there.  Some blocks were all darks, some were all lights, and some were half and half.

An all-dark square.

A half-dark, half-light square.


And here I changed the photo colors to black and white to check out my judgment of lights and darks.  After I saw this photo I switched a few strips to a different bin! 


Here I've put 12 of the 16 squares on a design wall and looked at them in black and white.


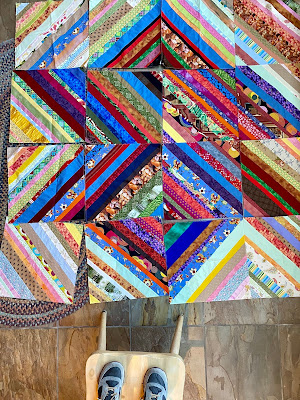
With all sixteen squares finished, I started laying them out on the floor.  I had to stand on a chair to take this picture!  Obviously, they are not laid out in the correct order, but you get the idea.


Sewed the squares together, then started the laborious, tv-intensive job of taking out the tissue paper.   (And a significant mess on the floor, I might add!)  Next time I will use un-fused Pellon, I think, so I don't have to tear out all that paper.  I thought about using muslin squares for my background, but I thought it might be too stretchy, as I was sewing on the bias.  Now, after the fact, I don't think that would have been a problem.  So, next time muslin or Pellon.

* * *

At this point, I want to make an observation.  And pose a question to you.  When you make a scrappy project, for example using only red scraps to make squares, do you experience the phenomenon of not having made a dent in your scraps?  I sure do!  When I got all these squares sewn, the strip bins did not seem very much emptier at all.  I recently did some scrappy blue hand-appliqued squares, but I still have a ton of blue pieces in my scrap bins! 
I wonder if there is a scientific principle to explain this. 

***

Check back to see my next post about finishing this quilt!

Thursday, March 5, 2020

Liberty of London EPP

I came across this little package of Liberty of London pre-cut hexagons that I bought in London on a past trip there.  The package contained 50 fabric hexagons and 50 EPP papers. 


So, while watching a quilting show on my computer I started basting the fabric to the papers.


These fabrics are such a joy to work with!  They are soft as "buttah!"


Aren't they beautiful/gorgeous!?!


Not sure what I'll do with them, but I'll keep you posted!