Sunday, June 27, 2010

Tumbling Blocks Layout Again

I laid out all of my tumbling blocks recently, because I wanted to make sure I had the rows laid out correctly, and I couldn't see any other way to do it.

I made sure everything was laid out in the right order, ready to work on.


I just love how they look when they are all together like this, and can't wait to get them all sewn up. I sewed a few rows together, and unfortunately overdid a bit, as my fingers were quite sore afterward.

The doctor gave me some cream to put on my hands a few times a day. It is like a topical Advil, and it really helps my hands and fingers feel much better.


Tuesday, June 22, 2010

Asian-Style Wall Hanging

I got my wall hanging hung on the wall! Hooray!

It took quite a bit of wrangling, what with using hanging tabs, and using a different type of hanger, but I finally got it finished and hung up. (I'd previously given a sneak peak here.)

I bought the center panel a few years ago while I was at PIQF (Pacific International Quilt Festival) in Santa Clara, CA. Ever since, I've been thinking about what to do with it.

With the help of the great clerks at Britex Fabrics, I chose the borders: a small gold/white fabric for the inner border, and the luscious banded red for the outside.

+ + + + +

I'll show you some details now, the pretty little flowers (are they dogwoods?),


The woman in the scene,


. . .and the smaller figure,


. . .and here's a close-up of part of the hanger.


Now we have a much nicer view walking into the hall, instead of a blank wall.


The wall-hanging, by
the way, covers up a door opening in the wall
which houses the fusebox.


Sunday, June 20, 2010

A Great New Shopping Bag


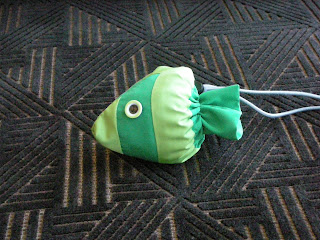
I picked up the greatest little tote bag the other day. When all folded up, it looks like this little fishy!


When the bag is unfolded, the fish remains in the corner, and we see seaweed and water bubbles above.


KittyStitches seems very interested, doesn't she!

I like having a few bags that can be folded up into a tiny bundle, when I want to carry an empty bag in my pocket or purse.

Wednesday, June 16, 2010

Moving Along With Tumbling Blocks, incl. "A Slight Hitch"

I have moved along to The Sewing Together of the Tumbling Blocks. There are 18-19 blocks in each row. I have only one little seam to stitch up between each block, then have to break the thread and start on another one, so I'm doing lots of starting and stopping. But it's fun going through the blocks again, and seeing some fabrics which I'd entirely forgotten about!

The photo above shows my row of blocks on the ironing board, where every little seam needs to be ironed open.

^ ^ ^ ^ ^
The next photo shows two rows of blocks lain out across my lap. At this point, The Sewing Together of the Rows, I'll be sewing little uphill and downhill seams. For this part I'm using some pins to help keep the corners together in all the right places.
Below you see two sets of two rows I've sewn together, laid out on the dining room table.
After I sewed Row 2 to Row 1, I tried adding the Row 3 blocks individually, without sewing them into a strip first. I found it to be a little more tedious than sewing the rows together first, so that is how I'm planning to continue.

Now I've come to the slight hitch. I'm not sure that I have my rows in the correct order. Because they do not resemble the original photo of all the blocks lain out on the floor. Not sure why this has happened, as I was pretty careful about how I labeled all the rows. I'm still sure that each of the individual rows is stacked in the correct order. But I'm not taking any chances. I'm going to wait till I can lay them all out again, so I can check on things. So for now I'm working at trimming up the blocks with the rotary cutter. And, of course, other projects are always around!

Monday, June 14, 2010

Oregon Shakespeare Festival


MisterStitches and I just got back from Ashland,
Oregon. That's where the Oregon Shakespeare Festival is held. We love going to Ashland, as it's a very nice town, with lots of good places to eat and good places to shop.

(And Oregon doesn't have state sales tax, so I save a lot of money when I shop there!!!)

One of my first stops is always the wonderful Fabric of Vision store. It's a cut above your average quilt shop, and carries some really cool fabrics. (One year I bought some great Japanese linen fabric--still haven't used it.....) The tall exposed brick walls of the store are decorated with a changing gallery of beautiful quilts. The owner, Sandi Globus, is great, always ready to show her newest fabric acquisitions and help choose fabric.

Here are the fabrics I bought this time at Fabric of Vision. Aren't they beautiful!!! Can't wait to get them washed and use them.

Then, of course, we did see a few plays while we were in Ashland. The first night there we saw Twelfth Night at the outdoor Elizabethan Theatre. It rained during the play, but it didn't bother us at all. We both had parkas with hoods, and we had a blanket over our laps. The rain was very light, with no wind, so I was hardly even aware of it. The did have to squeegee off the stage during intermission, though.

Day Two we saw Hamlet in the afternoon and Henry IV, Part 1 in the evening. The evening play was outside again and, again, it rained, but still was not bothersome.

On the third day we saw Cat on a Hot Tin Roof in the afternoon and The Merchant of Venice in the evening. This evening it didn't rain during our play! However, it rained quite hard just before the play, while we were eating dinner. It was very, very cold that night, though, and my ankles got chilled!

Yes, I know that Cat on a Hot Tin Roof was not written by Shakespeare!!! There are always a few non-Shakespeare plays on the schedule. All of the plays were excellent, and we had a great time.

Seeing Shakespeare performed, versus reading the play, just brings the words to life. My personal opinion is that one should always have read a Shakespeare play before seeing it performed, as it is easier to follow the plot. Then there are the little nuances and extra bits that the actors put into the play, to further the meaning, add humor, and personalize it. That's when it's really great.

Saturday, June 12, 2010

New Bloomers for BabyStitches

Little BabyStitches needed some bloomers sewn, so I went back to McCalls pattern #M5916. I had used it about a year ago to make her some bloomers.

And this wonderful way pattern companies have of putting all the sizes in one pattern? (Note the "Size OSZ" in the photo below.) Not so wonderful when you want to sew the next largest
size of the pattern.


At least I had saved the little strips previously cut off the paper pattern. I was able to very clumsily tape them onto the main pattern piece, but it was all mangled and wrinkled and hard to handle!

I needed to make two pairs, so I used the first cut fabric as a pattern to cut the second pair.

Here are two pairs of finished bloomers! Ready to mail to BabyStitches.

I forgot to sew in a tag with the size on it. Didn't even think of it till I was all finished. So I used a fabric pen to write size 3 on the back of the waistband.

I found these cute little tags that say "PS I love you," so her bloomers have that little sentiment stitched into them.

Thursday, June 10, 2010

Blog-aversary

I completely overlooked my "blog-aversary!" It was April 5th, 2009 when I made my first (admittedly very lame) posting.

I've had a lot of fun with this blog, and through it I have made some great blogging buddies. It's quite a little blogging community out there.

Thank you to everyone who has read my blog.
I appreciate having you along for the ride!

Monday, June 7, 2010

Hemming Blue Jeans

Ever since I saw Gail's great tutorial on hemming bluejeans, I've been anxious to try it out. It looked like the greatest idea ever. Unfortunately(?) all the jeans I've bought for the past year have been petites, so I didn't have any jeans to hem. I was very happy when I recently bought a pair of jeans that need hemming. So I turned to Linda's tutorial.

Go to her blog for the complete instructions (link in first paragraph), but just shortly here, I ironed up the hem as it should be, and trimmed off 1" below the fold line.
I made four little snips along side the side seams, then pinned up the hem. I left the little tabs sticking up, and sewed right over the side seams.
By using Linda's method, I didn't have to sew over three layers of side seams on the jeans. I only sewed over two layers, because those tabs were sticking out. Who needs 'em!?

I do own a spool of that special blue jeans hemming thread (which is orange/gold--the perfect color--and a little heavier than normal thread). But of course, I didn't have it with me when I was hemming these, so I used a very dark, dark blue.
After sewing the hem up, I trimmed off those little tabs. Just threw them away. Said adios! This hemming method is niftier than sliced bread--really!!!

The finished blue jean hems look great. I'm thinking, however, that at some point I might sew over the seams again with my orange thread, because it makes the finished jeans look so nice...

Linda, thanks so much for showing me how to do this.

Sunday, June 6, 2010

Farmers Market

On Saturday MisterStitches and I went to the Farmer's Market. It was a beautiful, sunny, warm day, and we had a nice walk there.

I saw some really pretty sweet peas.
I absolutely love sweet peas. Their sweet scent is so delicate.
It was such a festive gathering, with fresh fruit and veggie smells around every corner.

There was fresh rhubarb...
carrots and other produce,
and another of my favorite flowers, hydrangeas.
Altogether, a great outing.

Friday, June 4, 2010

Craft Bar

I went out to a bar last night without my husband.
++Oh, Shocking!!++

Actually I went to the Craft Bar, which is held at the SF Museum of Craft and Folk Art. I have previously attended crafting sessions there, and enjoyed them. They have come up with a slightly different theme now, serving beer and snacks during the evening and teaming up with ETSY.

So I walked to the museum, and paid my $5.00 admission. That was all it cost me! There were three "stations" set up: one learning crocheting and knitting, one making funny little stuffed robots, and the one I chose--sewing a fabric flower brooch.

And this is what I came home with! Not the jacket, but the cute little rose pinned to the jacket. It was fun to make, and the whole evening was festive. There were so many people there that it was actually hard to walk around! As I left, I asked someone if they had any idea how many people were there. The answer was a guess at 400 people!


Here's a close-up of my fabric rose. I like the random way it turned out. I started with a 45-inch long strip of fabric about five inches wide. All the fabric, by the way, was donated by Britex Fabrics, which as you know is one of my favorite stores. They also "donated" some employees for the evening to teach us.

Note to self: Next time take your own scissors, ones I can wear around my neck, as there were not nearly enough scissors to share!


The craft fair ran from 6:00 pm to 8:00 pm, and I finished with my little flower at about 7:30. So I walked around a bit to see what other people were working on. I came to the knitting and crocheting table, piled high with needles and balls of yarn. I asked if I could try knitting, so I did.

I learned to knit when I was a little girl, but never really made anything of consequence, and as a young adult I shifted over to crocheting as my method to use up yarn.


But it was fun to review, and to get to knit a little bit. I would desperately love to be able to knit some socks, but I think that is probably a long ways in the future, if it ever happens. (I have some socks that SisterStitches made for me and they are just wonderful--I love them!)

BTW, I tried to cast off my stitches after I had knitted this far, but I couldn't quite get the hang of that, so I'll try it again later. For now I will just keep knitting!


And when the evening was over they let me keep the knitting needles and yarn. WOW!

I told you that ETSY was one of the partners in this evening? They had some of these funny bumper stickers which they were giving out.

Craft Bar is something that the SFMOCFA is doing once a month, on the first Thursday evening. I hope that I can make it to more of the get-togethers!


By the way, I picked up a few of these bumper stickers. Would you like one? Leave a comment here and I will give away three of them.

Tumbling Block Quilt--Next Step

I picked up the template I had made at Tap Plastics. (It cost almost $30 to make it, but I figured with as many hexagons as I have to sew together, it would be a good investment to have a template to trim them all.)

Tap Plastics did a good job. Nice, smoothed-out edges, nothing sharp. I love that I can take any kind of odd idea to Tap Plastics and they can make just the thing I need.


So I tried out the template on a couple of my hexagons. It was then that I discovered I didn't have any of the tacky plastic stuff to put on the bottom of the template to keep it from slipping as I used it.

Double-sided tape to the rescue!!! I don't suppose I'm the first person to ever use this as a substitute, but it worked fairly well. I've trimmed about 50 hexagons now, and it is still sticky enough. It's also cheap and easy to replace the tape when I need to.


Another wish in my little mind was that I had one of those turntable-type cutting mats, since there is a lot of turning with all this trimming. I live near some great fabric stores, but they are not your average quilting store (nor a Joanns) and neither shop carried this type of cutting board.

So I improvised again by placing a small towel under the cutting board. Then I simply spin around the towel, cutting mat, and everything when I have cut all I can reach, and need to turn it to trim the other side.


Here is an untrimmed stack of tumbling blocks (photo on right). There are some points sticking out, and a lot of uneven edges.


After trimming, the stack looks like this photo, everything the same size, with edges nice and even.

I think I will need all the help I can get to make this quilt top without puckers and lumps in it!


And I am left with this nice jumble of confetti fabric scraps! I think
it's quite pretty, and even MisterStitches encouraged me to save the scraps till I get all done. But whatever will I do with them? I suppose I could use wash-away stabilizer and sew them all together to make ????