Showing posts with label MisterStitches. Show all posts

Sunday, August 2, 2020

Five-Minute Craft

This really does take only about five minutes!  Super simple.  And, no machine needed.  (Although you could use it, if you'd prefer.)

I found this cute little denim "container" on good old Pinterest.  Here is the link.


You start with the bottom leg portion of some jeans.  The hem on the jeans makes for a nice finished edge on the top of the resulting container.  Below you can see that I'm hand-stitching the upper portion of the leg together.


Next I pushed open the sewn-up leg and sewed across the shorter ends to box off the bottom of the container.


This is just a view of the other side of this boxing-off seam.  You can see where the hand-sewn seam intersects the side seam of the jeans.


Then simply turn it right side out, fold down the top a little, and sew on a button if you like.  Or a pin.  Or a brooch.  Or a ribbon bow. Or a different kind of embellishment.  


I've been using this on my sewing table to toss in little scraps that are big enough to cut into 2" x 2" squares.

I should add that I used a pair of my own jeans for this project.  I could get a bigger denim container if I used a pair of MisterStitches's jeans, because they have a wider leg.

Monday, August 5, 2019

Upcycling Art Exhibit

At our local Gualala Arts Center there was an Upcycling Art Exhibit in April.  And here is what I entered into the show.


I make a lot of dog/cat beds, as you know.  So I thought I would "class one up" a little bit for this show.  Taking a discarded shirt of MisterStitches, I cut a large rectangle out of it for the body of the dog bed.  Then I sewed up the placket so it would be "sealed."  I rather roughly embroidered "Bow Wow" onto the shirt front.  If I had thought about it for even a little bit, I would have remembered to put some interfacing or another piece of fabric under the embroidery.  But I forgot about that.  So the words are slightly gathered.  I doubt if any animals will mind that!  

I stuffed this shirt full of discarded quilting scraps, then sewed up the opening.  Someone suggested to me that I should take the buttons off, so a dog won't bite them off.  And I fully agree with that, so off came the buttons!  All ready for a doggie to snuggle in. 

Monday, October 22, 2018

Some of you may know (remember) that I am a long-time member of the Bear Patch Bits Club.  This club is part of Bear Patch Quilt Company, located near Minneapolis/St. Paul, Minnesota.  SisterStitches is the manager there.  I've made several visits to the store, when I've visited family and friends in the midwest, and it is a really, really nice store.  Lots of wonderful fabric, classes enough to choke a, well, a bear, coffee and cookies, nice quilt samples all around.

Now to the Bear Patch Bits Club.  For a mere $40.00 for a whole year (I think that's what it was), I receive a package in the mail every month.  Containing twenty (yes, 20!) 5-inch squares of new fabric that the store has  recently gotten into stock.  Accompanied by a nice letter (written by SisterStitches!), usually containing a quilt pattern using 5" squares, and also a yummy recipe.  

I have to tell you that these packages have become like Christmas every month for me!!!  I see that oversize white envelope in my mailbox, and I know that there are 20 pieces of joy inside!  Really, each one makes me very, very happy.  This happy relationship has been going on for many years.

Bear Patch Quilt Company is going to close within a few months from now.  I know.  It's very sad.  And I certainly don't begrudge the owner and employees a nice retirement.  But that also means that my little white envelopes will no longer be coming in the mail.

Well, MisterStitches has often been the spectator to my opening said envelopes, and he knows how happy they make me.  So, he really stepped up.   He asked me if he could provide a similar thing for me.   After I picked myself up off the floor, I said, yes I think you can!!  So I pointed him to Missouri Star Quilt Company, and told him that getting a charm pack in the mail would definitely mean the world to me.  

So last week he presented me with the first box.  I opened it and this was inside.  A beautiful, beautiful charm pack of "island print" batiks.  Oh so beautiful!


Just look at them all!


Such luscious colors!!


Aren't these blues gorgeous!!


And the reds/purples!


See what I mean!!??!!


As you can see, MisterStitches really hit it out of the ball park with this idea!  
I think I'll keep him around.

A friend witnessed me opening the box and going through all the colors.  Oh my, it was so much fun!

Monday, June 4, 2018

Pet Beds

In the name of cleaning up in my studio a little bit I sewed some pet beds recently.  That at least got rid of two pairs of jeans lying around in my studio and a few bags of fabric scraps.


 Two of them were made from some wild pink knit fabric.  I recognize it as coming from my The Loft, my LQS (local quilt store).

I got three beds made today.  The plaid one is from MisterStitches old jeans.  They were the warm kind, lined with flannel.  I thought that might make a comfy pet bed.  The bed isn't square because, as you know, pant legs are usually tapered.  But I don't think that will bother the pets!


 The pink fabric was given to me last week by someone who said it is for my pet beds.  I wasn't sure if it was to be the outsides of the beds, or just get put inside, but I chose to make some beds out of it.  There is still over a yard left, and all my fabric scraps are gone now.  I might save some of this pink fabric to make some leggings for GranddaughterStitches when she comes this summer.  In fact, I think I may have made her some leggings out of this very fabric a few years ago.


Sunday, November 8, 2015

For MisterStitches

MisterStitches had a birthday recently.  As I was thinking about what to give him, I had an idea.  We really don't give each other birthday presents in a big way any more, as we don't need any more "stuff."  We do make a special point to go out to dinner to celebrate, though.

But I wanted to give him a little something.  So I decided to make him some baseball-themed fabric coasters.  He always uses a coaster at his desk.  And here is what I came up with.


I used some nice baseball fabric that I ordered from Bear Patch Quilting Company, in Minnesota.  The baseballs on this fabric have a used, rather old look to them.  And I paired it with some of my brown grunge fabric by Moda to make a little bit larger mug rug. 


You can see that I also used some San Francisco Giants fabric, too, his favorite team.

MisterStitches was very happy with his present, and told me it was one of the best presents he's gotten.  (Really--he was serious!)


Sunday, May 12, 2013

Sewing Aprons

Some friends of ours, Hilla and Margaret, own and operate Twofish Baking Company.  It is an amazing, amazing, bakery, coffee shop, lunch place, and on some nights, a great place to have yummy pizza and a glass of wine.  MisterStitches goes there every morning he can to get one (or more) wonderful morning buns.  They are like his fuel in the morning.

One day I commented to Margaret that her apron was worn beyond belief.  She told me that she would love to have a new apron!  So then the ball was in my court.  And here is what I came up with.


This apron is made from a very cute "bakerly" fabric I found while on a trip to Pacific Grove, CA.  I thought it very appropriate for the purpose.  


Margaret likes her aprons to be lined, but my pattern was not for a lined apron.  So I simply made a second apron (complete with pockets) and used it for the lining. 


And this is apron number two.  Slightly different style.


The lining for this apron is 40 Ginkgos organic cotton from Harmony Art.  Harmony is always more than happy to help me out with my fabric needs! 


40 Gingkos
I was really wishing I had a dress form to take photos of these aprons.  Alas, I don't.  But here is Margaret, showing off her apron, in their sunny, bright, welcoming bakery.

*The Sticky Rolls are my personal favorite at Twofish!*


Wednesday, February 20, 2013

A New Shopping Bag for MisterStitches


I recently made a new shopping bag for MisterStitches.  We always take our shopping bags with us now, so MisterStitches has quite an assortment in his car's trunk.  He always tells me that he likes the Green Bag Lady's bags the best, and also that he needs a new bag.

So I got busy and made him a bag from the GBL's pattern, provided on her website.  MisterStitches does not like thin or unsturdy bags, so I used this green/beige fabric that is upholstery weight for the bag.  He really, really likes this new bag.  I told him the only thing it's lacking is a Green Bag Lady label and number inside.  Maybe I'll have to get some labels of my own. . .

Saturday, October 1, 2011

Cell Phone Holder


Hi! I recently made this cute little cell-phone holder for myself. I should have done this several years ago. I know. And I should have this several months ago. I know. Better later than never?

MisterStitches and I go to a lot of baseball games. I never take a purse with me, because I don't want to have to keep track of it. But I do need a few little things with me. I use pockets when I can, but now I have this nifty little bag to hold just a few things.

Courtesy of SisterStitches, I used a pattern from Quiltsmart. (We all want to be smart quilters, right!?!) This cool pattern comes printed onto fusible web. How smart is that! In the photo below you can see that I've ironed the fusible pattern onto my fabric. It also gives instructions on how to use two different fabrics, one for the outside and one for the lining, if one so chooses. You can see all the cutting lines and folding lines printed right there.


Here you can see the two different fabrics that I've chosen for my little bag. Inside and outside.


Per the printed (on paper) instructions, I am now folding one line to meet another. All perfectly spelled out for me.


And this is what I created. You can see that it's only about 6" tall.


Because of the folds, inside are two separate pockets. Just a good size to hold my phone, some money chap stick, a credit card.


And here it is on me. This is how models are supposed to pose, isn't it?

Sunday, July 3, 2011

Embroidered Flower Quilt


This is the latest quilt I have started. I bought this pattern many, many years ago, and am just now getting around to making it! There is a lot of embroidery on this quilt, and I need to have a hand-sewing project to work on. Sometimes I go over to someone else's house for a quilting group, and sometimes MisterStitches and I take road trips on fairly straight roads where I can sew without getting carsick!


This is the first block I made, to test out the pattern and see if I liked it before I prepared all fourteen squares. I think it turned out quite well with the dainty little flowers and leaves.

My optimistic thought is that by the time I get done with all this embroidery, I'll be fairly good at it! I learned to embroider when I was fairly young, doing mostly cross stitch and stem stitch. And I would say I'm fairly competent at it. But I didn't even know that back stitch existed until a couple years ago, thanks mostly to Jenny of Elefantz, who does amazing embroidery. So, I would like to improve on my skills.

The preparation took me quite a while to do, as there is a lot of cutting small pieces and strips, and sewing them together. The pattern said to tea-dye my muslin, which I did, but it turned out too dark. At that point, I didn't want to try to lighten it, or to dye another piece of muslin. So I made the executive decision to just use the unbleached muslin as it was. It had some nice slubs and irregularities in it, so I was happy with that. Each block consists of a muslin center square (or rectangle), a narrow print border, then a narrow muslin border, then a slightly wider print border for the outside. And they are not very big squares; the smallest one is 7" square finished, and the largest is 7" by 14" finished. I'll walk you through it here.


First I cut many, many 1 1/4" strips of muslin, because I knew I was going to need a lot. And of course, cut out the center blocks from the muslin, too.

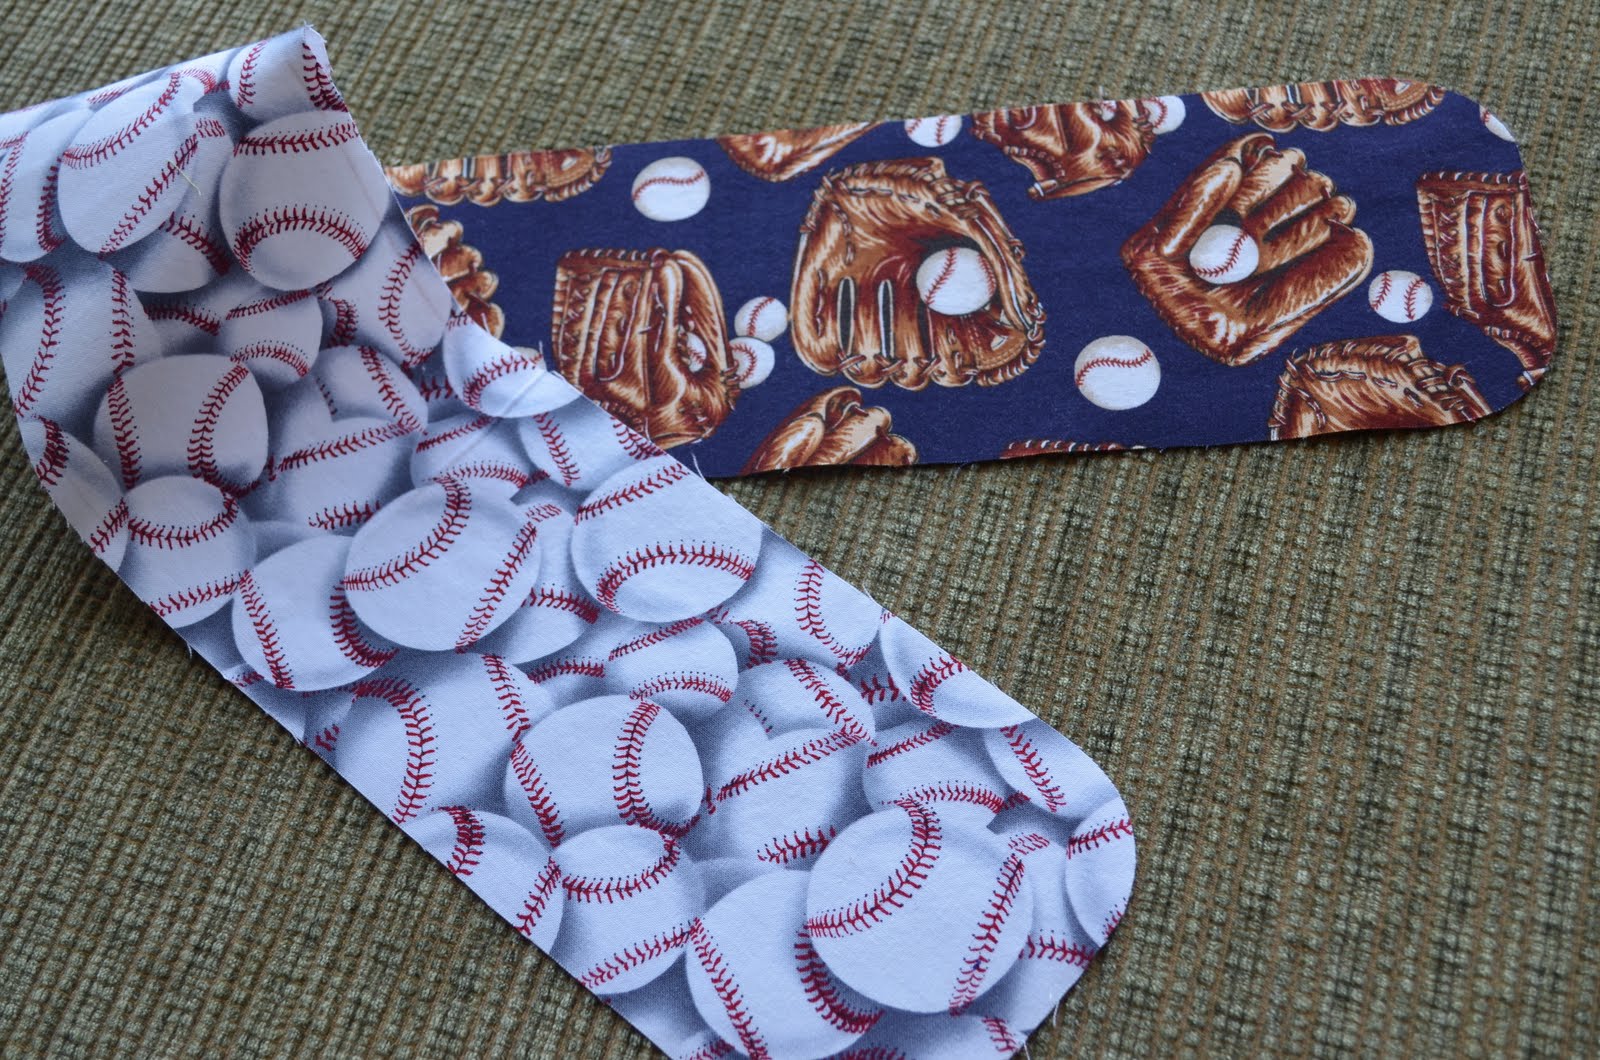
For each individual block I cut out the print borders that I had chosen.


Here is the first 1 1/4" print border sewn around the muslin center.


And now I have the second border, the muslin one, sewn onto the block.


Then I sewed on the final border, which is a tiny bit wider than the others, but only by 1/4 inch! I made these outside borders wider than they were supposed to be. My thinking was that this would provide a little bit more fabric for the embroidery hoop to grab. That left my outside edges a little uneven, but it will be all trimmed up after it is embroidered.

Both of the muslin pieces will have embroidery on them. The only small difficulty in piecing these blocks was that I needed to press toward the colored fabric always, in order to have that small (3/4"!) muslin border free of seam allowances. That was not the way the seams wanted to lie, however, so I had to do a bit of coaxing with the iron.


After the block was finished I ironed on a piece of lightweight fusible to the back. This made it easier to trace the pattern onto the fabric (less slippage) and also makes for a nice base for embroidery.


Then, to the light box to do some tracing!

Or a window works well, too. I used a new pen that I found called "Frixion" by Pilot. I found out about this pen on my friend Gail's blog. It is a nice little 'felt tip-type pen,' with the unusual quality in that the marks can be erased. On paper, you simply rub away the marks with the special end of the pen. It is not a traditional eraser, but a rubber piece that uses friction (hence the name of the pen) to make the marks disappear.

However, on fabric the ink disappears when you iron it. And it's just a small touch of the iron that does it. How cool is that!!!??? (Thanks, Gail.) The first one I bought was a mistake, though, as it was a .7 pen. Way too heavy on the inky side. The .5 pen is a much better choice. (The .7 was the only pen the store happened to have when I was there.) I found the first one in a Walgreens, and the second one at a quilt shop. The line is so nice and small that I think I'll be covering most of it up with my thread, but I can always get rid of any stray marks with a light sweep of the iron.


Here is a shot of a different block after it was all traced. I really like this pen for tracing on fabric.


The pattern instructions said to add some batting to the back of the block before embroidering it. They said it would make for a more "quilty" look to the embroidery. I've never worked that way before, and thought it would be impossible to embroider through all that. But I tried it and it actually worked! So I cut a small piece of batting for each block. I used a polyester batting here, as I have a hunch that will be easier to sew through than cotton batting.


The last step was to put each little completed block into its own (recycled) plastic bag. I labeled each with the block number that is inside. Now I can just grab one (or a few) of my blocks to take with me to work on.

After I completed all these steps, I laid all the separate blocks out on my
bed--in the correct pattern order placement--to see how they would look together. I had kind of done this with just the print border fabrics before I started cutting, but now that they're all sewn up, it gave me a much better image. I found that the quilt didn't look quite balanced, color-wise. Too many dark borders in one corner, for example. So I just switched some of the blocks around. As long as I traded the same size blocks, I don't think it will matter. I ended up with a more pleasing color scheme.

I'm very excited to get started on this project. As I said, it has been languishing in my pattern file for a long time now. Each time I saw it I would think, "That is so cute--I really want to make up that pattern."

Sunday, April 3, 2011

A Quilt for MisterStitches


Remember when I showed a few peeks of a red quilt a while back? It is finished now and I have come up with a name for it! "Painted Desert" from "Grand Canyon Suite." This quilt came out quite big; I can't remember the exact size, but I think it's about 75" wide, and fairly square-ish. It is for our guild's challenge show this year, the theme of which is "Rhapsody in Hue." That was why I chose to have a musical reference in the title.

It is from a Kaffe Fassett pattern that I saw in a magazine. It's very simply strips sewn together using a 60 degree angle to join fabrics to create the strips.

Here you can see how I quilted it, just 1/4" lines on either side of each lengthwise seam. Easy peasy.

I really had fun with this quilt because I had such beautiful fabrics to work with. Which led me to a little epiphany-type thing. We quilters all have our special fabrics in our stashes, our very favorite ones, the ones we are afraid to use. Or at least I do. Being afraid to use up my special fabrics has been a stumbling block for me. But I finally realized that the fabric folded up so nice and neatly on my shelves is not doing me any good. I get a little enjoyment from it when I'm looking through the fabrics for something specific. But why buy and keep fabric if I'm not going to use it? I realized this several months ago.

Working on this quilt, which included many of my favorite fabrics was enjoyable for me because of the beautiful fabrics. All the while I was working on it, I was enjoying the colors, the patterns, and how they all went together. So I don't feel that I lost any fabric, I just used it, and I truly savored it during the process.

Below you can see a sample of the strippy binding that I used. That was a first for me. I've always used one single fabric for my bindings.

MisterStitches really likes this quilt, so it is going to be his quilt. Knowing that, I chose a mottled red flannel for the backing, so it will be nice to use while we are watching a movie on the sofa.

Sunday, June 6, 2010

Farmers Market

On Saturday MisterStitches and I went to the Farmer's Market. It was a beautiful, sunny, warm day, and we had a nice walk there.

I saw some really pretty sweet peas.
I absolutely love sweet peas. Their sweet scent is so delicate.
It was such a festive gathering, with fresh fruit and veggie smells around every corner.

There was fresh rhubarb...
carrots and other produce,
and another of my favorite flowers, hydrangeas.
Altogether, a great outing.