Thursday, September 27, 2018

Progress. . .

I've been making progress on one of my three quilts for our guild's challenge show.  That's really a good thing, because they need to be turned in next week!


Here is a cloud in my blue patchwork sky.  I machine felted regular batting onto a sheer white fabric. Then I tacked the fabric onto the quilt.  That saved me from the uncertainty of how the felting action would affect the background, if at all.


And this is a shrub.  A real close close-up of a shrub.  I started by laying down some random fibers that I had collected from my dryer's lint trap after washing new fabric.  Then I embroidered feather stitches over the top in a very random way.  I repeated the embroidery with different colors.


And I'm quite proud of this!  It is a  brick sidewalk, and I think it turned out pretty well, for someone who isn't an expert in free motion quilting!  I checked Pinterest for "free motion quilting bricks" and whose name should come up but Lori Kennedy!  She's a queen in my eyes, of free motion quilting.  I followed her great directions for bricks, did a practice piece, then went to work on my little sidewalk. I used a chalk marker to make the parallel (and in some cases slanted) lines, to keep my bricks fairly even.


This is maybe more detail (and quite different lighting!) than is really needed, but I thought I'd include some more photos of the bricks.


After the challenge show opens next week, I'll show you the finished photo of this quilt, and my other two quilts, too.

Sunday, September 16, 2018

Two-Inch Squares

I was reading recently about Bonnie Hunter.  Many of you will know of her as she is a wonderful quilter and teacher, with several books to her name.  I've never taken a class from her, or met her, but I read about an idea she uses.  Bonnie doesn't use a thread catcher (thread spider, leaders and enders, whatever you call them) at the beginning and ending of her seams when sewing patchwork.  Instead, she has a stack of small squares beside her sewing machine.  She pairs together two small squares, and sews them as her beginning piece and ending piece.  Does this make sense?  Then she is left with lots of little two-square pieces, the beginnings of a scrappy quilt.

Here is just one of her many books about quilting with scraps.


So I have been cutting some of my scraps into two-inch squares.  When I'm watching tv, or doing something else, I pair two different squares and face them right sides together so they are all ready to use.  I have a small drawer divider tray where they can sit nicely next to my sewing machine, within easy reach.  The already stitched two-patches get placed in the bigger part of the divider tray. 


I actually found some pieced scraps that had been trimmed off something else and I cut a few 2" squares that already consisted of two different fabrics.


This wire drawer divider was holding a few safety pins, and not really being used, so it now sits  beside my sewing machine.  The two lower stacks are single 2-inch blocks, and the sewn-together ones get put in the upper section of the divider.


I'm not sure how many of these little two-patches I need, but I'll keep gathering them and I'll store them in a bin to go together some day into a larger quilt.  Check back on this blog in ten years or so to see if I've finished the quilt top!!

Thursday, September 13, 2018

Sashiko Design for the Quilt Guild Challenge

Several years ago I started a sashiko embroidery piece in a class with Sylvia Pippen.  Like a lot of my sewing, it got put away half-finished to be discovered at a far distant time.

I came across it and decided to finish it, as there wasn't very much more to do on it.  And as I was working on it, I realized that the pretty blue mottled fabric (in the center below) was very similar in color to our guild's challenge fabric for this year (the outer fabric below).

 I decided to frame it with the challenge fabric and finish up the wall hanging.  Dear Daughter-in-law-Stitches was visiting us, and since she has such a good artistic eye, I got her input on my borders.  We agreed that a thin white border and slightly bigger black border would work well inside the blue fabric.  The white brings out the white stitches, and the black helps "tame down" the brightness a bit.

This photo shows the fabric auditioning process.  


So I made the strip sets and sewed them onto the wall hanging to make a mitered border.


Here it's all laid out with the borders sewn on, ready to be mitered.


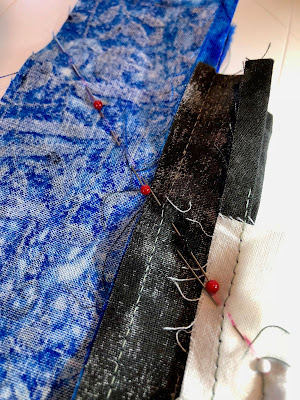
You can see a little bit of the diagonal line I drew to mark the 45 degree line, and then I added pins to stabilize it while I stitched it.


The front is finished!!  I did very minimal stitching on this, with a solid line 1/4" inside the white border, and some wavy stitching (#4 on the Bernina) in the outer blue border.  I may return to it and use blue thread to make a hand-quilted circle just outside the white embroidered circle.


Here it is all put together.  I debated about blue or black for the binding, but chose black to make a good stopping point for the eyes.  Now it is all ready!  I even have the label and hanging sleeve sewn on!!


Tuesday, September 4, 2018

A Little Light on the Subject

I have found a new light that I use when doing hand work.  It is called "Luxjet."  Although I don't think it's particularly luxurious, and it is nothing at all like a jet.  Can't figure out how they got that name!!


But it works real well for me.  It is worn around the neck, and the two "arms" are flexible, so I can point the lights at whatever I want.    It is very, very lightweight, and doesn't bother my neck at all.  And I am one who tends to have neck muscle problems, so this is a big deal for me.  The flexible arms are wonderful.   In this next photo the lights are on, although it's a little hard to tell that. 


There are two little tiny light bulbs in each end.  The options for lighting are:
1.  First light only
2.  Second light only
 3.  Both lights 
4.  Neither light

The photo below shows the button on the side of the light, which is how the lights are turned on.  This photo also demonstrates the flexibility of the light.


The above photo shows the little opening which is how the light is recharged.  I simply plug it in with my phone charger.  No Batteries Required!  I really like that part of it.

I found this light at Amazon, the What-Did-We-Ever-Do-Without-It online store.