Showing posts with label Sashiko. Show all posts

Thursday, September 13, 2018

Sashiko Design for the Quilt Guild Challenge

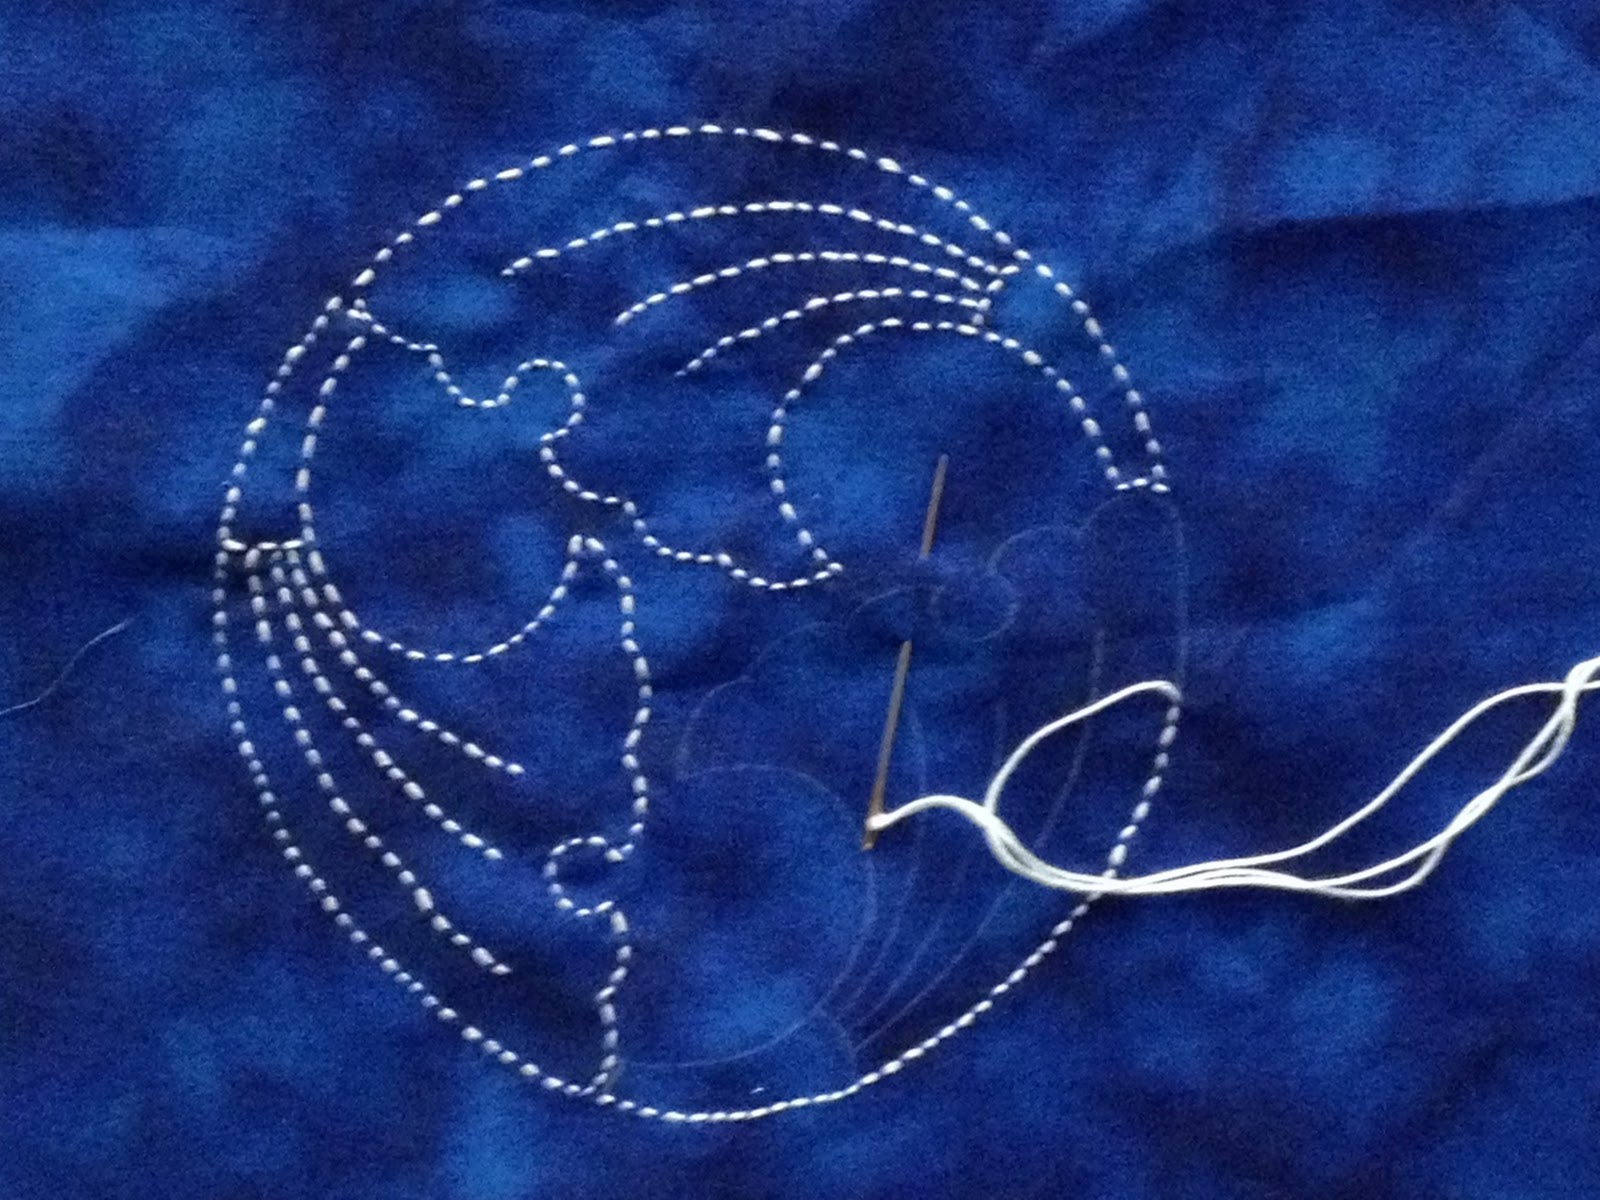
Several years ago I started a sashiko embroidery piece in a class with Sylvia Pippen.  Like a lot of my sewing, it got put away half-finished to be discovered at a far distant time.

I came across it and decided to finish it, as there wasn't very much more to do on it.  And as I was working on it, I realized that the pretty blue mottled fabric (in the center below) was very similar in color to our guild's challenge fabric for this year (the outer fabric below).

 I decided to frame it with the challenge fabric and finish up the wall hanging.  Dear Daughter-in-law-Stitches was visiting us, and since she has such a good artistic eye, I got her input on my borders.  We agreed that a thin white border and slightly bigger black border would work well inside the blue fabric.  The white brings out the white stitches, and the black helps "tame down" the brightness a bit.

This photo shows the fabric auditioning process.  


So I made the strip sets and sewed them onto the wall hanging to make a mitered border.


Here it's all laid out with the borders sewn on, ready to be mitered.


You can see a little bit of the diagonal line I drew to mark the 45 degree line, and then I added pins to stabilize it while I stitched it.


The front is finished!!  I did very minimal stitching on this, with a solid line 1/4" inside the white border, and some wavy stitching (#4 on the Bernina) in the outer blue border.  I may return to it and use blue thread to make a hand-quilted circle just outside the white embroidered circle.


Here it is all put together.  I debated about blue or black for the binding, but chose black to make a good stopping point for the eyes.  Now it is all ready!  I even have the label and hanging sleeve sewn on!!


Wednesday, August 1, 2018

Hand Stitching On A Scarf

Way back here I talked about the scarf I started with a piece of shibori dyed silk.  I decided that I finally had enough of the sashiko-style stitching on it, and was ready to finish it.

I used a quilt binding to enclose the ends.  However, I cut the two strips only 1 1/8" wide, because I neither needed nor desired a sturdier binding.  I ironed over 1/4" along the long side, and folded over the short ends.  

Then I sewed the unpressed side of the strip to the end of the scarf. . . 


. . . and ironed it over the cut edges.


Then I simply folded the binding over the raw edge and hand-sewed it down.


All finished! 


I am fortunate enough to have GranddaughterStitches here to model the scarf for me!


 The final dimensions are 21" wide by 64" long, a pretty good size for a scarf.

Tuesday, May 29, 2018

Progress on "Sashiko Scarf"

I'm making progress on my sashiko scarf, which I started here.


Using random meandering stitches is a lot of fun!  I can literally just make it up as I go.  I usually pay attention to the dye patterns on the silk, making circles around them.


The tiny red threads are for basting purposes only, and will be removed when I'm finished.


Here's what it looks like on the back.  I think I like it!


Monday, April 30, 2018

Applique Handwork for a Road Trip (Part 2)

There was a slight change of plans for our road trip.  At the last minute I went by plane, rather than by car.  I was actually quite bummed that I would not get all that nice time to do hand sewing.  So I ended up taking just one project with me, as well as some crocheting.  

First of all, I went to my LQS (Local Quilt Shop) to buy some Perle Cotton in ecru to do my stitching.  They come in those cute little balls, all wound so precisely.  Well, that was until my kitties found it!  It happened just a few minutes after I got home.  So I took this photo and emailed it to Marva, my LQS owner, because I thought it was so funny!  She ended up putting it on Facebook, which I found amusing.  


 Those cats had gotten an awful lot of thread removed from the ball!  So the next thing was to re-wind the thread onto the ball. 


No, it's' definitely not the neat little ball that it originally was!


So here's the project.  I had a piece of tan-colored silk, kind of a very light cafe au lait color.  It's quite a few years old.  I acquired it by going to a class that was teaching us how to use traditional Japanese shibori dyeing. That's when natural plants are used to naturally dye fabric.  And the dye patterns are determined by how the fabric gets folded, pleated, or otherwise manipulated.  It's been so long since the class that I can't remember exactly what I did with my fabric. But it has some little random circles on it.  Some of the circles are square-ish shaped.


I paired it with this tan/red floral fabric for the backing.  I sewed the fabrics right sides together, but left the ends open.  My idea is to do some sashiko-type stitching in a random, free-form all-over design to hold the two fabrics together to be a scarf.


Here is some of the stitching.  It's quite fun to just go wherever I feel like with my stitches!  This photo shows the end of the scarf where I started the sewing.  You can see some of the pink basting threads in the photo.  I needed to keep the two fabrics stabilized, so they wouldn't shift around on me as I was handling it and stitching it.


And here's how it looks on the back.


I'm starting and stopping each thread by pulling the small knot through to the wrong side of the backing fabric, so they are all buried between the fabrics.


Sunday, March 31, 2013

Asilomar with SisterStitches

I just returned from almost a week at Empty Spools Seminars at Asilomar Conference Grounds in Pacific Grove, CA. I've been there before, and they have some truly awesome classes.  It is really a wonderful experience.  But this time it was even better because SisterStitches came with me! 


Doesn't she look relaxed sitting on the deck of our room!?!  We had a great time together, and we each chose the same class, too.  We were in Sylvia Pippen's class on Japanese sashiko and appliqué.  Check out Sylvia's website because there are fabulous pictures there.  She does incredible work.  And Sylvia is also a great teacher.  Lots of fun, fairly laid back, and really good at instruction.


Here is my work in progress.  I need to make some more flowers to applique, but you get the idea.  I already have the water pieces appliqued onto the backing fabric (which is a dark blue Moda marble).  The white lines are where I will do sashiko stitching.  The idea is plumeria flowers floating down a stream.  I'll let you see more of it as I progress in my work.


SisterStitches chose to work on two different designs.  (She's an over-achiever!)  The one above is very pretty appliqued waves, and you can see that she has started her sashiko stitching.


This pretty moon (or sun) belongs to SisterStitches, too.  She has begun her stitching on the waves, which will build up and splash in front of the setting sun (or rising moon).

While we've both done applique and embroidery before, neither of us had tried sashiko (although I've always wanted to and have had the materials for quite a few years now!).  The sashiko stitching is different from regular embroidery, as the stitches are larger, and each stitch has a space between it and the next.  You can see that a little bit in my practice piece below.


And here is one of the many deer that were around the Asilomar grounds.  They are actually quite used to people being around, so they don't scare very easily.  I still wouldn't want to get too close, though!

Isn't he sweet-looking!?!