Sunday, August 30, 2015

Lots and Lots of Coasters to Sell

I recently sewed a lot of coasters for my guild to sell.  We had a booth at Art in the Redwoods a few weekends ago, held at the Gualala Arts Center.  I'm not really sure how many I made, but there were quite a few!


I had some San Francisco Giants fabric, so I made some coasters using that.  Notice the nice baseball diamonds that I quilted on them!


When I ran out of the baseball fabric, I simply used orange and black fabric.  These would work for either the Giants or for Halloween!


Even though I am not a fan of the Oakland A's, I thought maybe other people might be, so I made some coasters out of yellow and green fabric, the A's colors.

These coasters would also be nice for fans of John Deere equipment!


Now here are some everyday coasters out of some pretty fabric.  I tried some rather random, straight-stitching quilting designs on these.  They were too small for free-motion quilting.


And here are some Christmas coasters!  Most of these have a Christmas tree quilted onto them.


And some more Christmas coasters.


This last photo shows Halloween and autumn coasters.


I really had a lot of fun sewing these.  They went fast, and it was gratifying to see the stacks grow taller and taller.

Tuesday, August 18, 2015

Hooray! I Won A Prize!

I'm not sure if you remember this quilt (from here).  I made it in a class at Empty Spools Seminars/Asilomar.  The class was taught by  Denise Oyama Miller and Nancy Ryan.

Last weekend was the annual Art In The Redwoods art fair, and my humble wall hanging won second prize in the Textiles category!  To say that I'm excited is A Lot of understatement.


The art display will be up until August 30, so if you're in the area you should really check it out.  There is a lot of phenomenal art, besides my own!


Sunday, August 9, 2015

"Welcome To Gualala"

My quilt guild's challenge for this year was entitled "Above and Beyond."  In my Tuesday sewing group we chose to interpret that as doing something above and beyond our previous quilting experience.  This project really was a challenge for us, a great big challenge!

In a magazine we saw some pictures of landscape quilts that were made by several different people each making one part of the scene.  We liked the idea, so we started with a photo of a scene we all knew very well, the road coming into the small town of Gualala, California.


I enlarged the photo some, and we cut it into six vertical strips.   From the enlargement I outlined the major lines of the scene with a dark marker.  Then I made a tracing to get my pattern pieces.  

I'm afraid I don't have any process photos (what was I thinking!?!), but I chose my fabrics, and used Wonder Under to appliqué the pieces on to my muslin background.  Together, we each marked the water and/or horizon lines on the muslin before we started sewing, and tried to keep as true to them as we could.


And here is the result.  (Mine is the second from the right.)  True to our human nature, we each interpreted our piece of the landscape and put our own imprint on it.  Some of us added fish, whales, etc.  Did I mention that this was a fun project!?!

Mine is the middle one here.

Amazingly, it came out somewhat close to looking like the real scene!  Most of our water and skylines matched up!


On this close-up of part of my strip, you can see where I added some tiny pieces of fabric to add some dimension, using the method I learned in the class at Asilomar where I made my "Gingko" quilt.  I added some tiny brown pieces at the edge of the water where it meets the brownish shore.  And I added some light blue pieces at the closer edge of the water.  In both cases I used a variety of browns, and a variety of light blues and placed them carefully on top of the quilt.  Then I carefully laid down some black tulle, and immediately basted it very closely with safety pins.  After I did tiny swirl free motion quilting over the tiny pieces, I very carefully trimmed away the edges of the tulle.  Then I continued to quilt some water lines.  


I used the needle felting attachment for my Bernina to add some texture.  I felted down some silk ribbon pieces to resemble plants and grasses, and some wool roving to add other texture in the shrubbery areas.  Also, some white rough-cut pieces of gauze to make clouds in the sky.


We called our quilt "Welcome to Gualala," because the scene is the road crossing the Gualala River, and then heading into town.  It gathered a lot of attention during the show because it was so unusual, and because it was a local scene.  A bonus for us is that someone bought our quilt at the Opening Night Reception!

Wednesday, August 5, 2015

More On My Large Hand-Sewing Project

I've been making good progress on my large hand-sewing scrap quilt project which I showed you here.

Part of the job for this project is cutting many squares, 


and

many corresponding circles of fabric.


Then I have the job of pressing under the edges for hand appliquéing.

 I cut a finished-size template from heat-resistant template plastic.  Then I put some spray starch in the starch can lid, and use a small paint brush (or, in a pinch, a Q-tip) to get a good press on the ironed-over edges of the circles.


After that comes the job of deciding which circle should go with which square of fabric.  
This is the fun part!
Not enough contrast.

Not enough contrast, plus two busy prints together (no!)

Better contrast.

A good combination.

I iron the squares in half once, 


and then once again so that they are in little folded-over squares.  


This shows me the centers of each side of the squares.

At this point I can appliqué the circle to the square.  I fold the circle in half and finger press the very edges, then turn and do it again to make fold marks which can be matched up with the fold marks on the fabric squares.  (Did that make sense!?!)  I use a fair number of those nice smaller appliqué pins to secure everything while I'm hand sewing.  The pins are only 3/4" long, so they don't get in my way as much as longer pins do.

I'm actually making pretty good progress on this quilt.  I still have many circles to appliqué, but I've already done A Lot Of Them.  So I can almost see the end!


Wednesday, July 22, 2015

A Half-Square Triangle Quilt From Bear Patch Bits

Some of you may know that I am a long-time subscriber to Bear Patch Bits.  Clicking on the link will tell you how to receive 20 five-inch squares in the mail each month.  Since I've been receiving them for so long, I have Quite A Few Squares.  My plastic shoe box gets more and more crowded each month.  Finally I said, "Enough!"  (Not "enough" bear patch bits--I can never get too many of them!)  But I knew that I had to finally do something to use all of these fabric squares (or at least a good chunk of them).

I am quite a fan of the half square triangle (HST) and have made a few baby quilts with them.  Like here, here, and here.  I like the process of sewing them, and how I get "two for the price of one."  Because when I'm done sewing I have two identical squares.


So I started off by going through my squares and pairing up a light and dark value of the same color. I used my nifty Fons & Porter quarter inch seam marker, which made marking the squares pretty quick and easy.  It has a center line to line up with the diagonal corners, and both edges of the ruler are 1/4 inch away from the center.


I used either a Frixion pen or a chalk pencil to mark the seam lines, depending on how light or dark the fabric was.  


Here you can see a stack of squares which are all marked, just waiting to be chain pieced together.  (I also love chain piecing!)


And here is one stack, all sewn, cut apart, and pressed.


This photo shows that the stack is as tall as this pill bottle.


And now I have finally stopped sewing squares together.  {pant, pant}  Then I counted them all.  That was a big job, too!  Do you want to guess the number of triangle squares I have?

590

Yes, five hundred ninety half square triangles.  I couldn't believe it either.  I think that should be enough to make a quilt.  Maybe a big one!!

And at this point, my plastic shoe box looks like it went on a huge diet!  Instead of being bursting to overflow status, it looks rather sad and empty.  I didn't intend to use every single square, but I only left a few unsewn.  Fortunately, my Bear Patch Bits continue to arrive, so my box is slowly building up another supply.

Wednesday, July 15, 2015

Tidying Up My Scraps

I think most of us have scrap bins that look something like this, right?  A big jumble of scraps all jammed together.  At least I have managed to separate mine into different bins for different colors.  (These plastic shoeboxes fit on my shelves real well!)


In this bin I keep my blue and black scraps.  Not very tidy, and it always requires searching through everything in the bin to find just the right fabric.


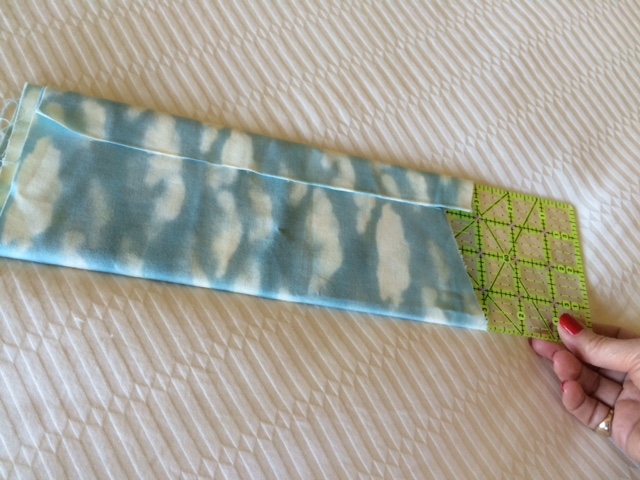
At one of our guild meetings a woman demonstrated how she used her four-inch ruler to tidy her scraps.  You've probably heard of this before--the fabric is laid out flat, then "rolled" onto the ruler.  The ruler is then pulled out and the resulting fabric folded in two (or three) for a nice neat bundle of scraps.  (Thanks, Judy!)


Fabric is rolled onto a ruler, then the ruler is carefully pulled out.

The fabric then is simply folded in half.

Or it can be folded into thirds if the fabric is too long,
depending upon the size of your storage container or drawer.

This way I can see all of the fabrics at once, so no more pawing through the bin of scraps.  The smaller scraps that I still wanted to keep but were too small to roll, I've just folded and put on the side  next to the neatly folded fabrics.  

And did I mention that this was a very easy, while-watching-television project!?!  Now it is a joy to take down one of these scrap bins to look for a fabric!

Tuesday, July 7, 2015

New Beds for the Cats

Percy and Cassie now have brand new beds during which they can spend about 75% of their day!  I had made some dog and cat beds earlier for the local Humane Society, so I guess I could do the same for my cats.


The cats really needed new beds.  I couldn't find ones that I liked in the stores, so I decided to make some.  I found some tutorials on Pinterest, and read a few different methods before deciding what I wanted to do.  I wanted to use wool fabric, because I know the cats really like that.  


So I used some wool that I found in my stash.  This plaid cashmere is leftover from a cape that I made myself quite a few years ago.  There was a nice bit of it left.  So I used it to make one cushion.  That was easy.


Unfortunately, I forgot to take progress photos, so I'll describe the next part.  I made a long tube out of some more leftover wool (most of which is wool I "found" and felted as an experiment).  All of the stuffing was fabric scraps.  I had saved up a good amount of those!  I stuffed the long tubes and sewed the ends together.  Then I hand-sewed the big loop-tubes onto the cushions.  That was a little bit of some hard work, as I had to pull the two pieces together and hand-sew at some awkward angles!  Not my best work, but I'm sure the cats don't mind!


Above is Percy in one of the beds.


And this is Cassie, in a red plaid felted bed with a green plaid on the bottom that doesn't even come close to coordinating!


And I'm still left with some scraps!  Why is it that scraps can never be completely gotten rid of!?!