Wednesday, December 28, 2011

Very Scrappy Quilt

Sometimes people criticize quilters for cutting large pieces of fabric into smaller pieces, then sewing those small pieces into a larger piece to make a quilt. We quilters all know that's just plain nonsense! But I have a project that used already small pieces of fabric scraps to make a quilt. The idea came from Elizabeth at www.ohfransson.com. She made a large floor pillow with this technique; I made a small-ish quilt. It can really be made in any size you wish.

Here is a photo of the finished quilt top.


Now I will show you how I got there!


I used my blue scraps for this quilt. I didn't sort them at all, or care if the blues went together or not. The above photo shows my little fabric bowl full of blue scraps sitting next to my sewing machine. Next to the fabric scraps is a pile of one-inch strips of off-white fabric. This fabric is leftovers from a sheet that I had re-purposed into a comforter cover.


This photo shows my first two pieces of blue fabric with a strip of off-white between them. This is the basic step for the whole project.


I sewed the 1" strip to one piece of blue, then pressed toward the blue. The 1" strips were all approximately 20" long, so they simply got trimmed down to the size I needed when I sewed them to the blue pieces.


Here is the first set of fabric sewn together and pressed.


Next I laid them on the cutting mat and trimmed one side to a straight edge. As you can see, I angled my cut, which adds to the fun and scrappiness of this quilt.

Now we're missing a couple photos, but the next step was to sew a 1" strip to my straight edge. Then I made another set of two (or maybe three) fabrics, made a straight edge, and sewed it to the first set I'd sewn. Get it?


And here is a finished block. You may notice that the block itself is not square either, but has a slanted edge on the bottom. That's ok! It will all work out in the end! Also, I have no idea exactly how big this square is. I just kept sewing fabric pieces until it looked about right. Really, this project is so forgiving! Which also makes it very liberating. Just grab a piece of fabric and sew it to the next one! It's so much fun.


Here's a close-up of one of the blocks. I particularly liked this fairy fabric. I remember it from quite a few projects ago!


And here's another shot of the finished quilt top. Now I just need to add borders and finish it up. If you look closely, you can see that the blocks and rows are not square and do not line up exactly. I used the same one-inch strips to join three blocks together into a row, then evened up the bottom and top edges. Another one-inch strip joined the rows into a whole quilt top. You may notice that the rows and columns are not parallel or even with each other. But it doesn't matter: it all gets trimmed square in the end.

Thursday, December 22, 2011

Christmas Decorations

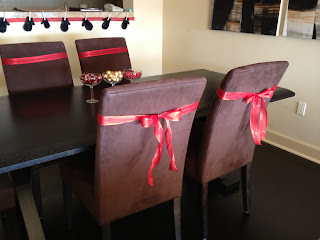
OK, here's a super easy Christmas decoration. Simply tie some beautiful ribbon around the dining room chairs! It doesn't get much easier than that. It helps that my chairs have ultra suede fabric on them to help hold the ribbons in place, but a little well-placed scotch tape could do the trick, too.


I think it was in October when I was in Costco and they had their Christmas decorations and wrapping paper out. They have such nice paper (in a much bigger roll than I'll ever use up!) and really pretty ribbon. The ribbon comes in a 50-yard roll, which usually lasts me several years! This year I used up more of it, but as I usually re-use my ribbon, I'm sure I'll still have lots left over.


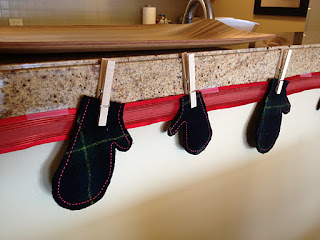
I had a plaid woolen skirt that I wasn't wearing any more, so one day I washed it in hot water and dried it on high heat to felt the wool. Now I've finally gotten around to doing something with it! I cut mitten shapes out of the wool, then did a decorative stitch around the edges in red. All that remained to do was clothes pin them onto a ribbon.


I have eight regular-sized mittens, and one small mitten. This decoration was slightly more work than the one above, but not very much bother, either!


Monday, December 19, 2011

Free Motion Quilting Class

I recently took a free motion quilting class at my local quilt guild. It was taught by Bonnie Toy, a very experienced quilter. She has some awesome ideas, and is a good teacher. Bonnie has a wonderful way of getting things across to her students.

Now, if you don't laugh too much, I'll show you some of my attempts in her quilting class. I've done some free motion quilting, but am nowhere near adept at it, and I always need more practice. I take every class I can find, as I always learn something new.

This first example is just a little elongated, three-loop figure eight, then three loopy loops around it. It's quite easy to move around the quilt top with this design.


My second example is a curved loop, but then it is "echoed" in a square manner, rather than with loopy round lines.


One of my favorite designs, and totally new to me, is this one that looks like intersecting circles. It requires drawing a grid onto the fabric, then snaking curves up and down the lines. The result looks like circles. It's awesome, and I am so glad I discovered this design. I now need to acquire the necessary grid, and my local quilt shop has some ordered, so I'll have one soon.


This design--or one similar to it--is know as bananas. However, I didn't make mine quite like everyone else did. But I'm pretty happy with the outcome. Just some random curves.


The above examples are all on one piece of fabric. You can see that the fabric is a very colorful batik print. One day I will do more practice quilting on this fabric and will have a set of placemats!

Friday, December 16, 2011

Christmas Decoration


This may look like an odd assortment of objects to be holding in my hand, but I promise there is a purpose here!

Two years ago I read an idea on the internet for a Christmas decoration which involved dental floss and little round white stickers. The stickers were attached to each other over top of a length of dental floss, then hung in a window. I made several very long rows of these and hung them up. It almost looked like snowflakes falling!

This year I decided to make a variation on this idea. I used last year's Christmas cards and my one-inch circle punch. I really went crazy punching out colorful parts from the cards! Then I used a glue stick to attach them to dental floss. Just randomly spaced, no measuring involved!


Here is the result, hanging on my front door. I simply put a piece of clear tape at the top and another piece at the bottom. I left a little slack in the hanging lines, so that when the door is opened or closed all the little circles wiggle and twirl and sparkle and look pretty!


Monday, December 12, 2011

Etcetera

I may have won the Bad Blogger Award. It has been way too long since my last post. Sorry about that. Things have been a little busy for me, but I know that's no excuse.

Today I'm going to give you a preview, through photos, of things I have been working on, and blog posts that will be coming in the future.
I promise.


I know that some of these photos need some explanation, and I guarantee that will be forthcoming!

Sunday, November 27, 2011

Box Tops For Education


I have saved my share of "Box Tops for Education" in my tenure as a school mom. It seemed we were always saving some kind of label or clipping a coupon for the kids to take to school. I'm not even sure what all those things were used for!

So I thought I was finished with all that when my kids graduated from school.

Not so!

With DaughterStitches teaching elementary school, I once again find myself cutting these little squares from my food packages. Now I'm even mailing them away to her!

Not that I mind of course. Glad to help, DaughterStitches.

Friday, November 18, 2011

Card Making


I've been making cards for the last two days. Once I get everything spread out all over the dining room table, I want to make more than just a couple cards! So I go into card-making-factory mode.

I made some more Christmas cards with little triangles of fabric for trees. I did this two years ago. You can see the original post here.


And a few more of this "circle tree" design.


I made a couple other styles of Christmas cards, too, but I'm not going to show them, because I know that SisterStitches will say, "OK now I've seen them, and the surprise is out, so you have to make me a different card!"

Then I made some "every day" cards just to have on hand.

A few different varieties. . .


These blue ones just have different sized squares glued down in a random, overlapping pattern. Makes for very sticky fingers!


Believe it or not, this cool paper was a paper bag that I received at a store. I wadded it up in a ball, then straightened it out again and glued it down. I like the rustic look.


And a couple more of these flower cards, made with silk flowers.


I used up the last of this cool trim that I've had for quite a while. I like that it is so colorful and festive.

All in all, I made 14 every day cards, and 32 Christmas cards. Not bad for two days of work. And we're not talking 8-hour days, you know!

Tuesday, November 15, 2011

Walking Across The Golden Gate Bridge


Walking across the Golden Gate Bridge is something I've been wanting to do for a while now. I chose a nice sunny October day with minimal wind. On the bridge it is always windy, so I wanted to start out with the best possible weather I could!

It looks like an awful long way to go when you first start out. I felt like I had gone a very long way when I got to the first tower, and that's not even half-way! I hadn't realized that there was such an uphill curve on the bridge. It really is uphill both ways!


It is 1.7 miles across the bridge, and I walked the round trip. It was fun, and challenging, too.


I suppose it's inevitable that some red paint gets spilled on the concrete. I've been told that workmen are continually painting the bridge. By the time they finish, it's time to start over again.


I looked back and saw this big ship heading out of the bay to the Pacific Ocean. You can see what a nice, clear day it was.


Several places along the way were phone call boxes for emergencies and also to call for personal crises. The smaller sign assures the reader that the consequences are very drastic for anyone who falls from the bridge.

There's only the short railing on the side, and also minimal railing between me and the six lanes of traffic zooming by. It was very noisy, with all those cars going by.


This is near the Marin County side of the bridge. I like how the bridge's shadow shows up down on the water. It really is a long way down.


And it's a long way up, too!


Here's a picture of a tired, windblown, but happy MissesStitches at the end of my walk.

Thursday, November 10, 2011

Simple Potholder


Several months ago I made this little heart piece as a sample for paper piecing in a class I was teaching. The class was Intermediate Quilting, taught by myself and my friend Kalynn. One day was spent learning paper piecing, and I have to say that the students did quite well with the challenge.

As you can see, this is a real simple design, easy to accomplish. So I had it lying around my studio, and decided to do something with it. I'm low on hotpads in my kitchen, and the rest, as they say, is history! Added some of that Insul Bright batting, found a scrap for the back and basted it together.

I outlined the red heart, then used a heart-like free motion quilting variation to do a little quilting around the outsides of the heart itself.


Thursday, November 3, 2011

Embroidery Thread Organization


I've been doing a little bit of organizing lately. Now, this is just a very small drop in a rather large bucket, but at least it's a start!

I've been using and collecting embroidery floss for several years now, and have never had a consistent place to keep it. As a result, I have little caches of thread all over the place. There will be a baggie with some threads in a drawer, some more in with my crazy quilting supplies, some more in a tote bag with a project, etc. That makes it hard to find a particular color of thread when I'm looking for it.


So these little floss bobbins came to my rescue. The bobbins and the box into which they fit so nicely. I've gotten quite a few of my thread skeins wrapped and "filed," as you can see. I'm separating them into sections of reds, purples, blues, greens, etc. Look in the upper right-hand corner of the box in the top photo. Those are all black thread. All. Black. Because I couldn't find the floss I needed, I was constantly having to buy more black thread. There doesn't seem to be any variation in the black hues, either.

At first I was a little leery of letting go of those little labels with the color numbers on the skeins. But I've never been one to follow those numbers anyway. If a pattern calls for "DMC 346 pink," I just find a pink in my thread stash that I think will look good in the pattern. So I let go of that worry. I think the advantage of having all my thread organized, and all in one place, easy to see and easy to choose will win out over not having their DMC numbers available.

Wednesday, October 26, 2011

Fabric from Stitch Simple


Look at the lovely fabrics I received in the mail from Stitch Simple!! Run on over there and check out their website. They sell pre-washed, pre-ironed, pre-cut fabric. Isn't that cool!?! I am one of those quilters who subscribes to the Alex Anderson school of washing fabric before I use it. So it's really neat to receive a package of fabric and have it all ready to use. As well as cut into squares for me so I don't have to!


My package contained reds, whites, and blues. I ordered an equal number of whites, and reds/blues. I'm thinking of half square triangles with a white and a color in each square. And you may have guessed it, I'm planning on making a Quilt of Valor, which will go to a wounded serviceman or woman.


And how did I come by these lovely fabrics? I won them! Yes, I did. From the Green Bag Lady, who had a giveaway on her blog, in conjunction with Stitch Simple.

Seriously, go check out Stitch Simple, as they have some lovely fabrics. They are not all in 5.5" squares, as mine are. They have different sizes of pre-cuts, also fat quarters, skinny quarters, 1-yard cuts, etc. And, they have a lot of lovely organic fabrics from Harmony Art.

Saturday, October 22, 2011

Art in the Redwoods 2011

I'm afraid I'm very behind with my blog posts. Art in the Redwoods happened in August, and I told you that my quilt earned 2nd place here. Now I want to finally show you another beautiful quilt that won the first place ribbon.


First place was won by Jo Dillon, a quilt she called "Turkish Delight." My poor photo doesn't do it justice. But you can see the intricate piecing and beautiful shading she used. Jo makes really incredible quilts.


And, once again, my quilt, "Somewhere Over the Rainbow," which won second place. SisterStitches quilted this great big quilt for me.