Friday, December 14, 2012

Some Embroidery Work


I recently finished this small wall hanging.  It is a pattern that I bought from Jenny of Elefantz.  She has loads of great designs.  You should check out her blog and website.  Jenny specializes in beautiful designs which often combine applique and embroidery. This particular wall hanging I made is only 11" by 12".  It is one of four little wonky houses in the set.

The light blue border is one of my go-to fabrics lately, by HarmonyArt Organic Fabric.  Maybe it's just handy for me, but I seem to be using it in quite a few projects lately.


Here is a close-up of some of the embroidery.  As you can see, it is quite detailed.  I have to say this was quite a bit of fun to do.

Saturday, December 8, 2012

A Christmas Tree Shirt for GranddaughterStitches

I just finished a new little Christmas shirt for GranddaughterStitches.  I found the great tutorial here.  (Thanks, VixenMade!)  Since she gave such a thorough tutorial, I won't bother to repeat it here.


I bought a simple long-sleeved t-shirt, some green lace, and sequins.  I used WonderUnder to fuse the lace to the shirt.


Then I sewed all the way around the edges to secure it before adding the sequins.


I used invisible thread to sew on the sequins.  Kind of a pain to work with, but the stitches hardly show at all!

DaughterStitches told me that GranddaughterStitches loved receiving the shirt in the mail.  She really likes all the "jewels" on the tree, but can't decide which color she likes best.  Oh, such problems!

Sunday, December 2, 2012

Christmas Decorations

Yesterday, on December 1st, was Christmas decorating day at our house.  But the first decoration has been up since last week, when GranddaughterStitches (and her mom!) were visiting us for Thanksgiving.


MisterStitches and I found this cute little creche made by Playmobile, and thought it would be great for GranddaughterStitches.  I mean, kids always want to play with the creche characters, right?  And we usually respond by saying, "No, no.  Don't touch."  Well, this is a creche that she is supposed to play with!


We all had fun putting the whole scene together, assembling the stable, and fixing all the small details. Above you can see the three wise men, part of their camel, and Joseph's donkey.


GranddaughterStitches, for some reason, liked having the little lamb on the roof, along with the doves!

Friday, November 30, 2012

Wall Hangings For Festival of Trees

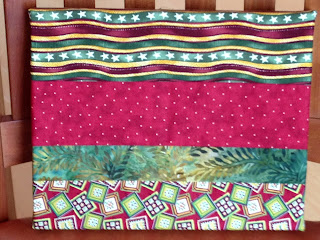
A few months ago a friend of mine brought me a simple wall hanging.  It had been made by wrapping several strips of fabric around a stretcher bar frame, and stapling the fabric to the back.  She asked me if I could make some of these for Festival of the Trees.  FOTT is an arts fair where our quilt guild (and many other entities) sell their goods to the public.  (It is always a big deal in the small community where I live.)  


So I ended up making 12 of these wall hangings, using mostly decorator-weight fabrics.  It was actually fun, just sifting through many different fabric samples and sewing strips into larger pieces.  I used 9" by 11" stretcher bars and my trusty staple gun.


These little framed pieces can be hung either horizontally or vertically with simply two little brads.


The two below could be sold as a set.


Then I also made a few with Christmas fabrics.


I don't think a tutorial is necessary.  It's a pretty simple process.  You could whip up a few of your own for some of your holiday decorations.

Wednesday, November 21, 2012

Progress on My HST Baby Quilt

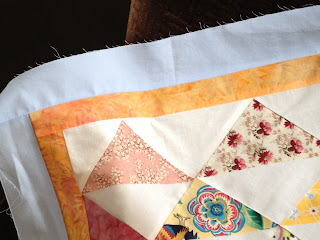
I recently posted about this baby quilt here.  And I fixed it up a bit, with some quarter square triangles on the top and bottom.


I found a great orange batik for the inner lining, and a really pretty soft light blue for the outer border. The blue is an organic fabric from HarmonyArt. It's actually more blue than the photo shows.  Poor lighting.  Poor photographer! 


I can't wait to start quilting on this one.  It would be easy to follow the diagonal lines, but I think I'd like to practice my free-motion quilting.  I'll keep you posted!

Sunday, November 11, 2012

Another Crocheted Baby Afghan

I finished another crocheted baby afghan.  Almost totally completed in cars and airplanes!


This time I used a variegated yarn, which gave me the design you see below.


Pastel yellow, pastel blue and some white.  It has a little sparkle in the yarn.  
Very soft and nice to work with.


Sunday, October 28, 2012

My New Purse

Recently my quilt guild (Pacific Piecemakers Quilt Guild) brought in two great teachers, Pamela Day and Roseanne Lauter of Purses by Design to teach a one-day class.  They were great teachers, and here is the purse that I made that day. 

Front of purse

For my outside fabric I chose a beautiful Kaffe Fassett fabric which I had been hoarding for quite a while.  I absolutely love this fabric.  It is a nice, medium-size purse.

Back of purse

Here is the back of the purse.  I placed the pattern very carefully to get this nice paisley print in the center.

Inside of front flap and magnetic closure.

This photo shows the inside fabric, which you'll see closer in the next photos.  It also shows the nice magnetic snap that holds the purse closed.

Inside pocket.

The pattern called for a pocket inside, so I followed the pattern for that.

Additional cell phone pocket.

But I also added another pocket.  I measured around my phone and made the second pocket just exactly to fit that.  Slightly shorter than the phone so it sticks out the top of the pocket, and just wide enough.  It turned out perfectly.

Feet on the bottom of my purse.

Look!  There are even feet on the bottom!  Very professional, don't you think!?!

I have bought and carried so many Vera Bradley bags in the past (quite a few) years.  I love her purses and I love her fabrics.  I've often been asked if I made my purse when I'm carrying a Vera Bradley.  Now at last, I can say, "Yes, I made my purse!"

Sunday, October 21, 2012

A Jacket For My Water Bottle

 During this summer's baseball season, I often took a reusable water bottle with me to the games, instead of buying (overpriced) water there (in a plastic bottle).  The trouble was, the water would really heat up, sitting there in my cup holder, which was usually in the sun.  So I made a little jacket for it.


Quite simple really.  I measured the height and diameter of my bottle, and planned to make the jacket slightly bigger than those measurements.  A cover fabric, a lining fabric, and a piece of Insulbrite to go in between for insulation.  Then I quilted it a little bit to hold it together. 


The next step was to sew a little fabric tab to the side, near the top, in case I want to attach it to a loop or ring of some kind.  After this I sewed the side seam, pinned the "tube" to the bottom circle, and sewed the two together.

I sewed a casing into the top of my jacket, thinking I would put elastic in there to cinch it up.  But that was not necessary.  It fits so snugly that it's not going to come off unless I pull it off.

So I fill it with water and a few ice cubes and off to the game I go!

Wednesday, October 10, 2012

Making Cards

I recently spent another day building up my card supply.  Not sure how many I finished, but below is a selection of them.


And a few close-ups.  Silk flowers and leaves are very useful for gluing to paper for a card.


This is what to do with some of that wonderful ribbon/trim that I can't keep myself from buying!


I use found objects sometimes in cardmaking.  The card below utilizes some leftover gift wrapping paper (the gold stuff).  The grill-like item is a piece of vellum that came in the mail.  An invitation or something.  And the red is some ribbon I had.  


Thursday, October 4, 2012

Half-Square Triangle Baby Quilt

I have a small quilt top finished.  It is a simple half-square triangle quilt, made from my Bear Patch Bits and some white Kona cotton.  I haven't mentioned my "Bits" lately, but they come from this quilt shop in Minnesota.  For $40 per year they send me 20 charm squares every month, cut from the new fabrics they have received that month.  It's really fun receiving the packets.  It also includes a newsletter, and quite often, a recipe and/or a pattern.  And it is all written by my SisterStitches!  She works at Bear Patch Quilting.


Any-hoo, I used several of my pastel-colored Bits to make HSTs.  In the above photo they are all laid out on a carpet. Following are a few close-ups of some of them.


I really like the rooster in this one below!


 And here they are all sewn together.  
Oops!  
I didn't add triangles to the ends of the rows.  That's something I'll file away for next time.  This time I'll just trim everything straight along the edges.  Stay tuned to see the finished product.


Saturday, September 1, 2012

Crocheted Afghan

 It has been quite a while since my last post.  Sorry about that, my dear readers (both of you!).  I've been spending a lot more time sewing than I have with my computer; that is my only excuse.


Here is one of the things I've been working on.  I decided to crochet a baby afghan.  I used to crochet many years ago, and felt a yen to crochet again.  So I bought some nice soft yarn (nothing fancy, I bought it at Michael's), and didn't have a pattern, so I just decided to make some stripes.


I found it a lot of fun to be crocheting again.  Just like riding a bike.  It's such a nice, portable project.  Much easier than taking sewing things with me.


Here are a couple of close-up photos.  I'm not sure what I'll do with this afghan, but I know I will give it away to someone.


P.S.  I've already started a second afghan!

Saturday, August 11, 2012

Counting Bracelet


Here is a little counting bracelet I made for GranddaughterStitches.  It was quite easy.  I simply bought some numbered beads in a local bead store. 


Then I added these colorful beads (above) in between each numbered bead.  I strung it all on elasticized beading cord, which is kind of like stretchy fishing line.


Here is the finished bracelet, before I attached the two ends together.  I needed to wait till GranddaughterStitches was actually here, so I knew how big to make it.


And here it is on her little wrist.  You can see that I added quite a few beads to make it fit over her hand.  And I could have made the numbers go higher, except I hadn't bought any more number beads.  GranddaughterStitches is so good at counting that she may be past eleven already!

Thursday, August 2, 2012

Memory Quilt

I recently completed a quilt top and quilt back made from clothing of a friend of mine, who died in 2011.  This, and a second quilt I'll make, will be for her family.  I've never made anything of this size out of clothing before, so that was a little bit challenging.  But it all turned out ok.  I actually included some seam lines and parts of pockets in the fabric squares.


Here is a  little closer photo.  I chose this pretty blue batik to border the quilt.  I'm going to sew a couple of special buttons onto the quilt top, too.


And here is the back.  I used the pretty batik fabric for most of it, then added a strip of solid blue close to one side.


Within that strip is a small emblem from a special t-shirt.  I simply put some fusible on the back to stabilize the knit, then treated it like any other fabric.


To figure out the correct fabric measurements for piecing the quilt back, I use precise drafting equipment and procedures in order to get everything to come out to the right size.  You can see that in the photo below.