Monday, February 21, 2011

Some Sewing by DaughterStitches

Some time ago I came across this little stuffed being that DaughterStitches made when she was a little girl. I don't remember how old she was at the time. I suppose she drew the outline and I sewed around it to form the little doll(?). I think it's incredibly cute, with the little lace ruffles sewn around the neck, arms, and legs.

If you look closely, you can still see some faint remains of the smiling face which was drawn on the doll. Guess I didn't have a permanent marker handy!
It reminded me a little bit of the "Summer Traveler" that I made a couple years ago for BabyStitches. See that blog post here.

Thursday, February 17, 2011

Intermediate/Beginning Quilting Class

Today was the second day of the Intermediate/Beginning quilting class that I am co-teaching with my friend, Kalynn. It's a lot of fun teaching these classes (we co-taught beginning quilting last fall).
The students we have are the greatest, eager to learn, and pretty quick to catch on.
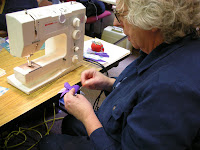
See how hard they're working!!!

Hard at it...


Here are some examples of their great work. Above is a LeMoyne star block. Isn't it pretty!?!

[And, BTW, did you know that LeMoyne means "the monk?" The question came up during class, so I looked it up on my iTouch. Amazing what technology can do!]

And here is a log cabin quilt block,

And another beautiful LeMoyne star.


Sunday, February 13, 2011

Quilt Retreat

I had the most wonderful time last week. I went on a mini-retreat with four other quilting friends of mine. We stayed at one friend's second house for three nights and boy, did we get a lot of sewing done. We were often up sewing till 11 or 12 at night. It was great fun.

I added a brown binding to this mini-quilt wall hanging (shown previously here). Unfortunately, I didn't have the right fabric to make a label, but I got the binding finished and the sleeve sewn on.


I also worked on piecing together these red strips for another quilt I'm working on. It is from a Kaffe Fassett pattern that I found in a magazine. I was struck by the simplicity of it. The whole thing is 5 1/2" strips, joined at a 60 degree angle to each other. The impetus for this quilt? My stack of red fabrics was getting too high to fit on the shelf!


Here is a photo of our little Bernina sweatshop set up in the kitchen. Four Berninas, plus one in a bedroom! Those machines were sure humming...

And here's a photo of the five of us when we went out to dinner one night. Yum!

I added sashing to some blocks to make a baby quilt...

Here is Gail's quilt, which she had just finished machine quilting. It looks great--little Dora the Explorer fabrics, mixed with frog fabrics.

Joyce finished up this simple sailing ship comfort quilt for our guild.

On the last day, when we were all heading home, Joyce's husband Larry showed up with a bouquet of flowers for each of us. I was blown away.
Aren't they pretty!!!?!

Friday, February 11, 2011

New Baby Quilt

I decided I wanted to make another baby quilt, so I gathered up all my leftovers of flannel fabrics. I'm making another Disappearing Nine-Patch, because that is so much fun to do. I made the pattern previously here in an adult size.
This involves creating nine-patch blocks (duh!), assembling them, cutting them up, then reassembling them. I tried to use four darker fabrics and five lighter fabrics for each nine-patch. So I arranged all these little squares on my dining room table. The top photo shows (most of) them all laid out on the table, just after I bumped my head on the light fixture climbing up there to take the photo!
This did a fairly good job of reducing my flannel stash (yippee!).
This bottom photo shows, basically, only one block. After meticulously laying out all the squares, and playing beg/borrow so I didn't have too many of one fabric in a single square, I put each set of nine patches into a little baggie (previously used baggies, I have to emphasize (!), but no food contents) to keep them separate. I think I would be doing myself a favor if I ironed all these 4 1/2" blocks before I start sewing.

Can't wait to get started!

Tuesday, February 8, 2011

Making Cards

I sat down recently to make some more greeting cards, as my personal supply was getting low.
As you can see, a few of them are of a similar design, which makes for efficient production(!). I used up a lot of my scraps for this batch of cards.


This one uses a pair of earrings I bought at Pay N Take (our local donation/resale event). I broke the posts off with a pliers.


The one on the left side is a lino-cut stamp that I made a couple of years ago in a class. On the right is a card made with hand-made paper, tied with raffia.


And this little cutie is made with buttons and a wooden butterfly. My drawing abilities cover stems, leaves, and grass, but that's about all!

Saturday, February 5, 2011

MOAD/Improvisational Quilting

I was fortunate to take a class last weekend from Ed Johnetta Fowler-Miller. The class was held at MOAD, the Museum of African Diaspora in San Francisco. I found out about the class a little late, and it just dovetailed in nicely with my schedule, and am I ever glad I took it!

This class was in conjunction with a quilt exhibit at MOAD called Textural Rhythms, from African American artists, one of whom was Ed Johnetta.

Ed Johnetta started us off making greeting cards, as a way of loosening us up. She laid out a plethora of paper pieces and told us to just start ripping shapes and glueing them down. Absolutely no planning or arranging was allowed! When we gave her our finished cards of glued scraps, Ed Johnetta put them into framed cards, which made them look like little works of art!

They turned out looking surprisingly good, and it was a very freeing experience.

Then we moved on to our sewing machines. Similar assignment this time, we started with a rectangular base of muslin, and started randomly sewing strips to it. Again we used the "just grab and sew" method, with no planning.

When we finished that, she told us to sew three more of them, then combine all four into a larger piece to use as a wall hanging. Below you can see my result.

We were using all types of fabrics, too, from quilting cottons to decorator fabrics to flannel. Anything goes with this method!

I'm planning to use a blue inner border and an orange-ish outer border/binding, after I get it quilted.

Project Number Three.
Ed Johnetta told us to create a piece of fabric by sewing together some random strips to form a rectangle. When I showed her what I'd sewn, she proceeded to cut it into pieces. Yes, really! Then she said, "Now sew them back together again in a different arrangement." So I did what I was told.
We ended up going through three or four episodes of her cutting up my piece of fabric! And this is the end result.
I love the crazy and impromptu look of it.
With this method of slashing/piecing, the piece ends up with some amazingly small pieces in it. I don't think I could ever have sewn such small pieces normally.
It was a totally liberating and awesome two-day class. Ed Johnetta was amazing, too. She is a great teacher and a lot of fun to be around. If you ever get a chance to take a class from her, jump at it!

Friday, January 28, 2011

Hand Quilting Frame

I had a couple very large packages waiting for me the other day when I got home. It was the quilting frame I'd ordered! It seems that whenever I order something, I want it to arrive later that same day! I'm always so anxious to receive it!


It was no different with this quilting rack. I managed to get it all set up and put together by myself, and now it's all ready to use. There sure are a lot of adjustments on it: higher, lower, more slanted, less slanted.

Now my tumbling blocks quilt is installed on it and I'm ready to start quilting. I finally got all those little seams pressed down (with only a few small burns on my fingers). And I have given up any notion that this is a portable project. Now it will just sit at home (for years?) while I hand quilt it.


With my little arsenal of tools set up beside me, I'm ready to go!

Thread snippers
Thread
Thimble
Needle threader
Thread Heaven conditioner
Rubber disc to pull needle through

* * *

No, wait a minute.
Now I'm ready to go. Gotta have that (non-greasy) hand lotion nearby!


I really love having the quilt set up for me to work on. It's so easy to go into that room and quilt for just a few minutes or for a half hour. Nothing to set up or put away. It is placed in my guest room, and I can watch tv while quilting if I want. Looking up occasionally helps keep me from getting a stiff neck.